If you garden, you need compost. Lots of it. A three bin compost system is the easiest way to make a steady supply, and you can build one from free pallets in a single weekend.
This guide walks you through a beginner friendly build that costs $0 to $80 depending on what you can scrounge. You will get a clear materials list, simple step by step instructions, and the exact rotation that turns kitchen scraps and yard waste into rich, finished compost in about three months.
If you want a place to use all that finished compost, take a look at our free raised garden bed plans. Otherwise, grab some gloves and let us get into it.
What Is a Three-Bin Compost System?
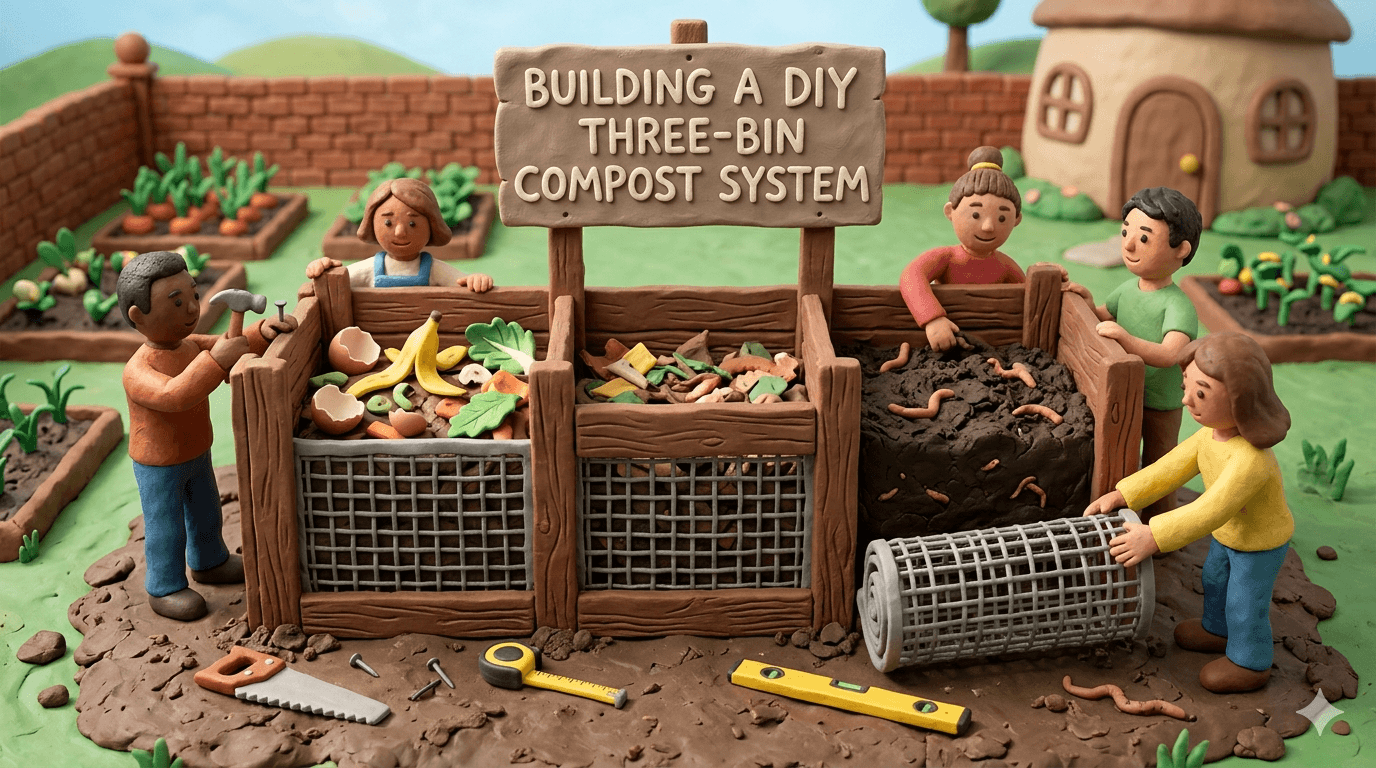
A three bin compost system is exactly what it sounds like. Three side by side bins, each about three feet wide, three feet deep, and three feet tall. Your scraps move through them in stages.
Bin one is your active pile. This is where you toss kitchen scraps, grass clippings, leaves, and garden waste as you go. Bin two is the cooking bin. Once bin one is full, you turn everything into bin two and let it heat up and break down. Bin three holds finished compost ready to use in the garden.
That simple rotation is the whole magic. You always have a place to add fresh material and you always have finished compost waiting. No more juggling one overstuffed pile.
Why Three Bins Beat One Bin
A single compost pile works, but it has problems. Fresh scraps mix with nearly finished compost. The pile is never quite done. You end up sifting through banana peels to find the good stuff.
Three bins fix all of that. Here is what you get:
- Faster compost. Turning the pile from bin to bin adds oxygen, and oxygen speeds everything up.
- Always finished compost on hand. Bin three is your garden ready stash.
- Cleaner separation. Fresh scraps never contaminate the nearly done batch.
- Bigger volume. Three full bins easily produce enough compost for a 500 square foot garden every year.
If you are serious about growing your own food, the upgrade pays for itself the first season.
How Big Should Each Bin Be?
Size matters more than most people think. A compost pile needs at least one cubic yard of mass to hold heat. That works out to about three feet on every side.
Smaller piles cool off too fast and never reach the 130 to 150 F sweet spot where weed seeds and pathogens die. Bigger piles are great too, but harder to turn by hand.
Three feet by three feet by three feet per bin is the standard for a reason. It also happens to be very close to the size of a standard shipping pallet. That is why the pallet build below works so well.
Tools You Will Need
You can build this with very basic tools. Here is the short list:
- Cordless drill with bits and a driver
- Circular saw or a sharp handsaw
- Tape measure and pencil
- Pry bar (for prepping pallets)
- Level
- Sledgehammer or post driver (for corner posts)
- Heavy work gloves
- Safety glasses
- Sturdy boots
A reciprocating saw is nice for cutting stubborn pallet boards but not required.
Materials List and Cost Breakdown
Costs are approximate. Pallets and posts are often free if you ask around.
| Item | Quantity | Approx. Cost |
|---|---|---|
| Wooden shipping pallets, 40 in x 48 in (heat treated) | 4 | $0 to $20 |
| 4x4 x 6 ft pressure treated corner posts | 4 | $40 |
| 1x6 x 4 ft cedar or pine boards (front slats) | 6 | $20 |
| 3.5 in exterior wood screws (1 lb box) | 1 | $9 |
| 2.5 in exterior wood screws (1 lb box) | 1 | $7 |
| 6 in galvanized hinges (optional, for lids) | 6 | $18 |
| Tarp, 6 ft x 8 ft (optional cover) | 1 | $10 |
| Total | ~$40 to $80 |
If you can find free pallets and salvage some boards for the front slats, you can finish this build for under $50.
How to Source Free Pallets Safely
Pallets are everywhere, but not all of them are safe for compost. The wood touches your soil, which feeds your food. Pick the right ones.
Flip the pallet over and look for a stamp on the side rail. You want one of these:
- HT means heat treated. Safe to use.
- DB or KD also indicate safe treatments.
Stay away from these:
- MB means methyl bromide. This is a toxic pesticide. Walk away.
- No stamp at all. You cannot verify what is on it. Skip it.
Warning
Never use pallets with chemical spills, oil stains, or unknown residues. The chemicals leach into your compost and end up in your vegetables. When in doubt, leave it.
Good places to ask for free pallets:
- Local hardware stores
- Garden centers and nurseries
- Feed stores
- Beverage distributors
- Small grocery stores
Most are happy to give them away because they pay to dispose of them.
Step-by-Step Build Instructions
Plan on a full Saturday for the build. Maybe Sunday for the optional lids.
Step 1: Choose and Prep the Site
Pick a spot that is level, gets partial sun, and is close to both your garden and a water source.
Avoid pressing the bins right against a fence. Air needs to move around the back, and a wet pallet against wood fencing rots the fence in a season or two.
Clear grass and weeds from a 4 ft by 12 ft footprint. Lay down a layer of cardboard if you want to suppress weeds underneath the bins.
Step 2: Inspect and Clean Four Pallets
You need four pallets total. One for each divider (three of them) and one for the back. Wait, do the math with me. A three bin run needs:
- 1 back wall pallet that spans behind all three bins, OR
- 3 back wall pallets (one per bin) plus 4 dividers
For simplicity, use four pallets standing up as the dividers, and three pallets laid on their sides as the back walls. Total of seven pallets.
Pull off any loose, broken, or splintered boards. Pound down any sticking nails. Hose off dirt and let them dry in the sun for a day.
Step 3: Stand the Back Wall and Dividers
Mark out your footprint on the ground. Each bin is roughly 40 inches wide (the width of a standard pallet).
Stand the back wall pallets up first, end to end, behind where the bins will sit. Then stand the four divider pallets perpendicular to the back wall, spaced about 40 inches apart.
Use a level to keep everything plumb. Have a friend hold pieces upright while you screw them together.
Step 4: Anchor With Corner Posts
This is what keeps the whole structure from leaning over.
Drive a 4x4 pressure treated post about 18 inches into the ground at each of the four front corners (where the dividers meet the front opening). A sledgehammer or post driver works fine. A post hole digger is even better.
Screw each divider pallet to its corner post with three or four 3.5 inch exterior screws. Repeat for the back where the divider meets the back wall pallet.
Once anchored, the bins will not budge.
Step 5: Add Removable Front Slats
You need to get into the bins to add material and turn compost. Solid front walls make that miserable. Removable slats are the answer.
On the inside face of each pair of corner posts, screw two short scraps of 2x4 vertically to create a slot. The slot should be just wider than your 1x6 board.
Now slide 1x6 boards down into the slot, stacking them up as the pile grows. Pull them out one at a time when you need to turn the pile or scoop finished compost.
Six boards per bin gives you a 4 ft tall front wall. You only need to stack them as high as your current pile.
Step 6: Optional Hinged Lids or a Tarp
You do not need lids, but they help in heavy rain (a soggy pile loses heat) and in dry climates (a covered pile stays moist longer).
Quick options:
- Hinged plywood lids. Cut three pieces of plywood to fit each bin top. Hinge the back edge to the back wall pallet. Add a stick to prop them open while you work.
- Single tarp. Drape a 6 ft by 8 ft tarp across all three bins and weight the corners. Cheap and easy.
Pick whichever fits your weather and budget.
Tip
A finished compost pile should feel like a wrung out sponge. Squeeze a handful. If water drips out, it is too wet. If it falls apart, it is too dry. Aim for damp and crumbly.
Lumber Alternative If You Cannot Find Pallets
No luck on free pallets? You can build the same three bin system with new lumber. Expect to spend about $180 to $220.
Quick swaps:
- Replace each pallet with a frame of four 2x4s and 1x6 cedar or pine boards.
- Build each bin frame to roughly 36 in by 36 in by 36 in.
- Use the same 4x4 corner posts and removable front slats as in the pallet build.
The build steps are nearly identical. You just spend an extra hour cutting and assembling the side panels instead of standing pallets.
The Three-Bin Rotation: How It Actually Works
Once your bins are built, here is how to use them.
Bin 1 (Active): Add fresh material here. Kitchen scraps, grass clippings, garden trimmings, fall leaves. Layer greens (wet, nitrogen rich) and browns (dry, carbon rich) at roughly 1 part green to 3 parts brown by volume.
Bin 2 (Cooking): When bin 1 is full, fork everything over into bin 2. The act of turning adds oxygen and the pile heats up fast. Let it sit and cook for 4 to 8 weeks. Turn it once a week to keep it hot.
Bin 3 (Finished): Once bin 2 has cooled and looks dark and crumbly, fork it over into bin 3. This is your garden ready compost. Use it as you need it.
Then start bin 1 over again. The whole rotation runs about 90 to 120 days from kitchen scrap to finished compost.
Aim for an internal pile temperature of 130 to 150 F. A simple compost thermometer (about $20) takes the guesswork out. Hot piles kill weed seeds and break down faster.
What to Compost (and What to Skip)
Stick to plant matter and you cannot go wrong.
Greens (nitrogen):
- Vegetable and fruit scraps
- Coffee grounds and filters
- Fresh grass clippings
- Garden trimmings
- Manure from chickens, rabbits, cows, or horses
Browns (carbon):
- Dry leaves
- Straw and hay
- Shredded cardboard and newspaper
- Wood chips and sawdust (untreated)
- Eggshells (technically neutral but great to add)
Skip these:
- Meat, fish, and bones
- Dairy products
- Oils and grease
- Dog and cat waste
- Glossy or coated paper
- Diseased plants or weeds gone to seed
- Anything sprayed with herbicide
When in doubt, leave it out. Those items invite pests, smells, and pathogens that a backyard pile cannot break down safely.
Maintenance and Care
A three bin system is low maintenance, but a little attention goes a long way.
- Turn the active cooking pile once a week in summer, every two weeks in cool weather.
- Add water in dry spells. Aim for damp sponge moisture.
- Cover the bins in heavy rain to prevent waterlogging.
- Inspect the pallets each spring. Replace any boards that are rotting or broken.
- Reset the corner posts if frost has heaved them up.
- Sift finished compost through a 1/2 inch screen if you want a fine garden ready product.
With basic upkeep, a pallet build lasts 5 to 8 years. Lumber builds last 10 plus.
Common Mistakes to Avoid
A few traps to watch for, especially on your first run:
- Building bins too small. Anything under 3 ft per side will not hold heat.
- All greens, no browns. A green only pile turns into a slimy, smelly mess.
- Letting it dry out. Dry piles do not cook. Add water.
- Letting it stay soaked. Wet piles go anaerobic and stink. Cover or turn.
- Skipping the turn. No turn means no oxygen, and no oxygen means slow decay.
- Building right against a fence. The fence rots and air cannot circulate.
- Using painted, stained, or MB stamped pallets. Toxins move into your food.
Avoid these and your three bin system will hum along for years.
Frequently Asked Questions
Frequently Asked Questions
About 90 to 120 days from kitchen scrap to finished compost when you turn the cooking pile weekly and keep it moist. Hot composting (130 to 150 F) at the right size and moisture can finish a batch in as little as 6 to 8 weeks. Cooler weather slows everything down.
Yes, if you want fast, hot compost. Turning adds oxygen, which the microbes that break down your scraps need to thrive. A pile that never gets turned still becomes compost eventually, just slowly and unevenly. The rotation between bins is the easiest way to turn without a lot of extra work.
A healthy compost pile smells earthy, like a forest floor. If yours smells sour or like ammonia, the balance is off. Too many greens (kitchen scraps, grass) and not enough browns (leaves, cardboard) is the most common cause. Add browns and turn the pile.
Yes. Cold slows the microbes but does not stop them. Keep adding scraps to bin 1 all winter. The pile may freeze on the outside but will stay alive in the center. Things really speed back up in spring. A tarp cover helps retain heat.
No. Open bottoms are better. Worms and beneficial microbes move up from the soil into the pile, and excess water drains down. Just lay cardboard underneath at the start to suppress weeds while the pile builds.
Not if you skip meat, dairy, and oils, and bury kitchen scraps under a layer of browns. A hot, well managed pile is unattractive to rodents. If you do see activity, add more browns, turn the pile, and avoid leaving scraps exposed on top.
Ready to Build Your Three-Bin Compost System?
That is the whole build. A weekend project, mostly free materials, and a steady supply of finished compost for years to come. Your garden will notice.
Once you have your first batch of finished compost, put it to work in our free raised garden bed plans. For more weekend builds, browse the full DIY hub.
Happy building, and happy composting.

Cole
Founder & Lead Researcher
Cole is the founder of Plan Your Homestead. He works in clinical research and brings a research-first lens to every guide on the site, drawing on a long family line of farmers for grounded, practical perspective.
More in DIY
More articles coming soon. Check back for new diy content.