So you decided to do this. You want to grow some of your own food, raise a few animals, learn to put up a pantry, and take more of your daily life into your own hands. Wonderful. The hardest part is over. The decision was the cliff. Everything from here is just steps.
This guide is your map. It walks you through the first ten steps every new homesteader needs to take, in roughly the order they need to take them. We will keep things calm, clear, and honest. No fantasy budgets. No 40 acre dreams unless you actually have 40 acres. Just a sequence you can follow whether you live in a fifth floor apartment or a farmhouse on a hill.
You do not need experience. You do not need a truck. You do not need a barn. You need a willingness to learn one thing at a time and the patience to let the seasons do their work. If you have those two things, you already have what most homesteaders started with.
Read the whole guide first. Then come back to Step 1 and actually start. By the end of this season, you will have grown food, learned a skill, and proven to yourself that this life is not just possible. It is closer than you think.
If you want a broader overview of the homesteading lifestyle before you start the steps, our companion pillar homesteading for beginners covers the big picture in friendly detail. This guide is the action plan.
Let us begin.
Step 1: Pick Your Scale Honestly
Before you buy a single seed, decide what kind of homesteader you can actually be right now. Not the version of you in five years. The version sitting at the kitchen table tonight.
There are four scales most beginners fall into. Be honest about which one fits your life this season.
Apartment or balcony. You have a windowsill, a balcony, or a small patio. You can grow herbs, salad greens, and microgreens. You can ferment, bake bread, and learn to can on a normal kitchen stove. This is real homesteading. Do not let anyone tell you otherwise.
Suburban lot. You own or rent a quarter acre. You can run a real garden, plant a few fruit trees, keep three to six hens if your zoning allows, and build a working compost system. Most modern homesteaders live here.
Small acreage. You have one to five acres. You can add bees, a small flock of ducks, a couple of meat rabbits, and maybe a pair of dairy goats. You have room to make real surpluses.
Rural acreage. You have five acres or more. Larger livestock, hay, woodlots, and full off grid systems become realistic. The work scales up too. Plan for it.
Match your scale to your time and money, not your dreams. A suburban gardener with a healthy budget will outproduce a rural homesteader who bought too much land and ran out of cash.
If you are still searching for land, our state by state homesteading hub compares laws, climate, and land prices across all 50 states. It will save you months of research.
Step 2: Write Down Your One Year Goal
You are going to be tempted to do everything. Resist it. The single most important habit you can build right now is choosing one headline project for your first year and protecting it from everything else.
Sit down with paper. A real pen. Write one sentence. Something like this.
By next spring, I will have a productive backyard garden and a small flock of laying hens.
That is it. One sentence. One year.
Everything else becomes optional. Every shiny new project that crosses your screen gets one question. Does it serve my one sentence? If yes, consider it. If no, write it down for next year and let it go.
This sounds simple because it is. It is also the difference between homesteaders who quit in July and homesteaders who are still going strong five years in. The ones who stay focused finish what they start. The ones who chase every new idea end up with half a coop, a dead garden, and a freezer full of regrets.
Tip
Try this exercise tonight. Set a timer for 15 minutes. Write a one page letter to yourself dated one year from today. Describe what your homestead looks like. Describe what you grew, what you learned, what you canned, and how you feel walking outside in the morning. Tuck the letter in a drawer. Open it next year. You will be surprised how much of it came true.
The clearer your goal, the easier every other decision becomes. Write yours down today.
Step 3: Audit Your Time, Money, and Space
Most beginners stumble at this step because they skip it entirely. They imagine the homestead they want and then start spending. Do not do that. Spend ten minutes on a real inventory first.
Time. How many hours per week can you realistically commit during the busy season? Not the hours you wish you had. The hours you actually have. Be honest. Most working adults can find five to ten hours per week. That is plenty for a starter homestead. It is not enough for cattle.
Money. What can you set aside for setup costs without going into debt? Write down a real number. A backyard starter can run under $500. A small homestead with chickens, fencing, and preservation gear usually lands between $1,500 and $5,000 in year one. Acreage projects climb fast from there.
Space. Walk your property with a notebook. Note where the sun lands at midday. Note what gets shade. Note where water collects. Note where the wind hits. Sketch a rough map. The best homestead designs come from people who watched their land before they planted on it.
Once you know your numbers, the next nine steps stop feeling overwhelming. You can match your projects to your reality. You can stop comparing yourself to people in different circumstances. You can plan a year you can actually finish.
This is also the right moment to play with our budget tool. It will turn your guesses into real estimates.
Step 4: Check the Laws Before You Spend a Dollar
There is a heartbreak waiting for the homesteader who orders chicks before checking the rules. Take an hour. Check three things. Save yourself a lot of pain.
HOA and deed restrictions. If you live in a planned community, your homeowners association may ban chickens, visible compost, vegetable beds in the front yard, and clotheslines. Pull your covenants. Read every page. Some HOAs are friendly. Others are strict. You need to know which one yours is.
City and county zoning. Local zoning sets how many animals you can keep, what species are allowed, and how close coops can sit to property lines. Some cities allow hens but not roosters. Some allow ducks but not goats. Some require a minimum acreage for any livestock at all. Call your zoning office. They are friendlier than you expect.
State law. State law covers raw milk sales, cottage food, water rights, and right to farm protections. These rules vary wildly. Idaho lets you sell almost anything from your kitchen. New Jersey bans raw milk completely. Knowing the rules before you start spares you from building a business model on something that is illegal where you live.
For a deeper national overview, see our guide to homesteading laws and zoning. For details on your state, browse the state by state hub.
This is not the fun part. Do it anyway. One hour of homework saves you a season of frustration.
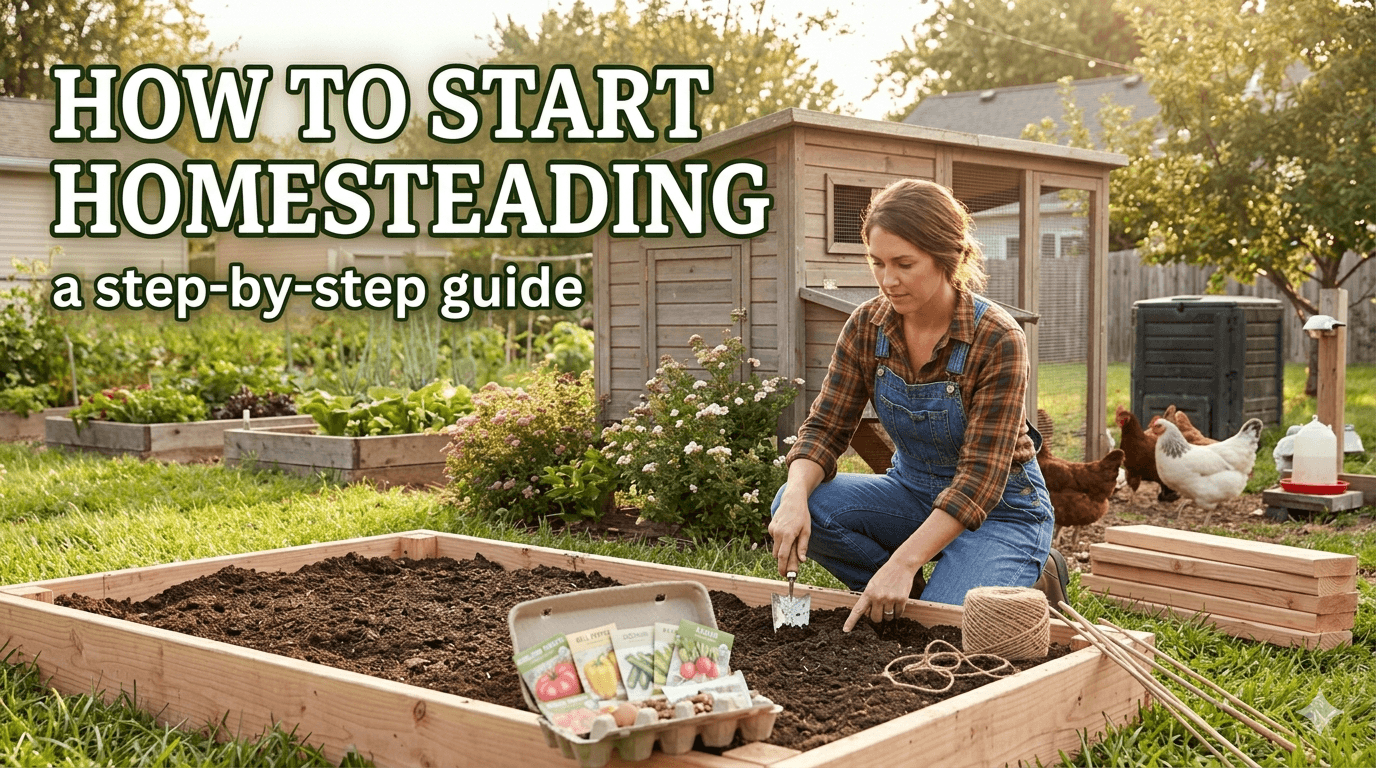
Step 5: Start Your First Garden
If you take only one piece of advice from this entire guide, take this one. Plant a garden this season. Even a small one. A single bed counts. A row of pots on a balcony counts. Just start.
A garden is the best first project for any new homesteader because it teaches you everything at once. It teaches you about your soil, your weather, your work habits, your patience, and your local pests. The feedback loop is fast. You can have a salad on the table eight weeks after planting a seed.
Pick five to eight forgiving crops your family already eats. A solid beginner list looks like this.
- Tomatoes
- Zucchini and summer squash
- Green beans
- Lettuce, spinach, and other greens
- Peppers
- Basil, cilantro, and parsley
- Garlic, planted in fall
- Potatoes
Five to eight crops grown well will teach you more than thirty crops grown badly. Skip the rare heirlooms for now. Save those for year three.
Get a soil test before you plant. Most county extension offices charge less than $20. The results will tell you your pH, your nutrients, and what amendments to add. Healthy soil grows healthy plants. Tired soil disappoints you.
Then learn your USDA hardiness zone and your local frost dates. Those numbers tell you when to start seeds, when to transplant, and when your season ends. They are the foundation of every planting decision.
Planting Calendar Tool
Enter your zip code to get a personalized planting schedule based on your USDA zone.
Try it free →For deeper guidance on bed design, layout, and what to plant in each season, see our beginner friendly vegetable gardening guide. It walks through raised beds, in ground rows, and container setups in plain language.
Whatever scale you choose, plant something this week. The garden is your teacher. Let it begin teaching you.
Step 6: Build Storage Before You Need It
Here is a mistake every first year gardener makes. They plant the garden, they grow more food than they expected, and then they panic in August because they have no jars, no shelves, no freezer space, and no idea what to do with fifty pounds of tomatoes.
Get ahead of it. Set up storage in spring, not in August.
A working pantry needs four things. Shelves, jars, a freezer, and a cool dark place. None of these are fancy. None of these are expensive.
Shelves. A simple wood or metal shelving unit in a closet, basement, or spare room. Build it deep enough to hold quart jars without crowding. Two units is better than one.
Jars. Start with a case of pint jars and a case of quart jars. Add lids. Lids are the part that wears out. Buy more than you think you need. They are cheap.
Freezer. A small chest freezer pays for itself in a single season. You can freeze tomato sauce, blanched greens, berries, and shredded zucchini in minutes. No special skills required.
A dehydrator. Optional in year one but worth it by year two. A simple stackable dehydrator turns extra fruit, herbs, and tomatoes into shelf stable pantry staples that last for months.
If you only have one of these, get the freezer. Freezing is the most beginner friendly preservation method on earth. You will be glad you did when the harvest hits.
When you are ready to start canning, our canning for beginners guide walks through the equipment, the safety basics, and your first batch.
Step 7: Add Your First Animal (Probably Chickens)
Animals are the moment homesteading goes from a hobby to a lifestyle. They are also the fastest way to get in over your head. Start with the smallest, easiest, most forgiving animal on the property. That is almost always chickens.
A small flock of four to six hens fits almost any rural or suburban setting where local rules allow it. They give you fresh eggs. They turn kitchen scraps into compost. They eat garden pests. They are easy to handle. They are not loud unless you have a rooster, and most beginners do not need a rooster.
Before you bring birds home, build the housing first. Plan for at least 4 square feet per bird inside the coop and 10 square feet per bird in the run. Use hardware cloth, not chicken wire. Chicken wire keeps chickens in. It does not keep predators out. Bury the wire 12 inches around the perimeter of the run or lay an apron of hardware cloth out flat on the ground. Raccoons and dogs will dig.
Plan for water that does not freeze in winter and shade that keeps birds cool in summer. Both matter more than the prettiness of the coop.
Pick a breed that fits your climate and your goals. Cold hardy breeds for the north. Heat tolerant breeds for the south. Friendly dual purpose breeds for families with kids. Our chicken breed picker sorts breeds by egg color, temperament, climate, and production so you can find the right match in a few minutes.
Once your coop, run, water, and feed plan are ready, bring home four to six pullets. Expect your first eggs around 18 to 22 weeks of age. Then watch how fast a flock that small fills your fridge.
Warning
Never buy any animal before its housing, fencing, water, and feed are ready and waiting. The single most common reason new homesteaders quit is impulse buying livestock without the infrastructure to keep them safe. Build the home first. The animals come second.
For deeper coop plans, feeding guidance, and seasonal care, our chicken hub has everything else you need.
Step 8: Learn to Preserve What You Grow
A garden produces in waves. You will have nothing for weeks, then suddenly you will have fifty tomatoes ripening at once. The skill that turns gardeners into homesteaders is preservation. Once you know how to put food up, surplus stops feeling like pressure and starts feeling like wealth.
Pick one preservation method this season. Just one. Get good at it. Add another method next year.
Water bath canning. Best for high acid foods like tomatoes, salsas, pickles, jams, and fruit. Cheap to start. A large stock pot and a rack will do. Most beginners start here.
Dehydrating. A simple dehydrator turns extra herbs, fruit, and vegetables into shelf stable pantry items. Apple chips. Dried tomatoes. Powdered greens. Tea blends. The energy use is tiny. The shelf life is long.
Fermenting. The oldest preservation method on earth and the most forgiving. Sauerkraut. Kimchi. Hot sauce. Pickles. Salt, vegetables, and a clean jar are all you need. The flavor is incredible and the food is good for your gut.
Freezing. No skill required. Wash, chop, label, freeze. Tomatoes, peppers, berries, blanched greens, shredded zucchini, and herb cubes all freeze beautifully.
Save pressure canning for year two. It is genuinely safe when done right, but the equipment costs more and the learning curve is real. There is no rush.
Whichever method you pick, write the date on every jar and bag. Future you will thank present you.
Step 9: Build Skills Through Small Projects
The best homesteaders are not the ones with the biggest properties. They are the ones with the most skills. Skills travel with you. Skills do not rust. Skills are the part of homesteading you keep forever.
Pick one skill per season and chase it with focus. Here are a few that pay off fast.
Sourdough baking. Bread is the gateway food skill. Sourdough requires no commercial yeast and produces bread that puts the grocery loaf to shame. The starter takes a week. The skill takes a season. The reward lasts a lifetime.
Basic carpentry. If you can measure, cut a straight line, and drive a screw, you can build raised beds, compost bins, simple coops, and shelves. None of it is fancy. All of it saves money.
Tool sharpening. A sharp shovel, hoe, knife, or pair of pruners cuts your work in half. Most homesteaders never learn this. The ones who do work less and finish more.
Mending. Patching jeans, sewing buttons, and repairing tarps is not glamorous, but it saves hundreds of dollars over the years. One good evening on YouTube will cover most of it.
Weather literacy. Watch the sky. Learn your local microclimates. Track frost dates and rainfall in a notebook. Homesteaders who pay attention to weather waste fewer crops and lose fewer animals.
A working homestead is a stack of skills. Each one you add compounds with the rest. The more you can do with your hands, the less you need to buy with your wallet.
Step 10: Plan a Real Budget and a Real Buffer
Money is the part of homesteading nobody talks about clearly. Either it gets glamorized as cheap or dismissed as something only rich people do. Neither is true. Homesteading scales to whatever budget you have, as long as you plan honestly and build a buffer for surprises.
Here are realistic year one ranges by scale.
| Scale | Year One Spend |
|---|---|
| Backyard starter (garden only) | $200 to $500 |
| Backyard with small flock | $1,000 to $2,500 |
| Small homestead (garden, chickens, fencing, preservation) | $2,500 to $6,000 |
| Acreage homestead (above plus infrastructure) | $10,000 and up |
Build a 15 percent surprise buffer into whatever number you choose. Something will cost more than you planned. A predator will get through. A storm will break a fence. A coop will need a roof patch you did not expect. The buffer keeps you calm when the surprise lands.
Spread your spending across the season. Do not buy everything in March. Wait for end of season sales on tools and lumber. Watch local online listings for free pallets, used jars, and secondhand fencing. Many homesteaders furnish half their setup from their neighbors.
If staying lean is part of your plan, our homesteading on a budget guide covers tactics for sourcing free materials, bartering, and staggering big purchases across multiple seasons.
A good budget is not about being cheap. It is about being honest with yourself.
Your First 90 Days at a Glance
Here is a compact view of what your first three months can look like. Adjust based on your zone and your starting season, but use the rhythm.
| Time Frame | Focus |
|---|---|
| Week 1 to 2 | Write your one year goal. Audit time, money, and space. Check local laws. |
| Week 3 to 4 | Order seeds. Plan your garden layout. Get a soil test. Build or buy raised beds. |
| Month 2 | Plant cool weather crops. Set up storage shelves. Order chicks once coop is ready. |
| Month 3 | Plant warm weather crops after last frost. Bring home chicks. Begin first preservation method. |
For a deeper week by week version, see our first year homesteading timeline.
A 90 day plan is not a contract. It is a rhythm. You will fall behind one week and catch up the next. That is normal. Just keep moving.
Common Reasons People Stall and How to Get Moving Again
Almost every new homesteader hits the same handful of stall points. Knowing them in advance is half the battle.
-
Waiting for the perfect setup. A crooked raised bed that produces food beats a Pinterest worthy plan that never gets built. Start ugly. Improve later.
-
Trying to do everything in year one. Pick one or two big projects. Protect them. Save the rest for next year. The homestead will still be here.
-
Spending too much before learning anything. Resist the urge to buy expensive gear in February. Use simple tools first. Upgrade after you know what you actually need.
-
Letting one failure end the season. A bad tomato year is not a referendum on you. It is a season. Take notes. Try again. Every homesteader has a list of crops that failed before they figured them out.
-
Burning out in July. July is hard. The bugs are out. The weeds are winning. The heat is brutal. Push through. August is when the harvest arrives, and August changes everything.
If you can clear these five hurdles, your first year will go better than 90 percent of new homesteaders. None of them are exotic. They are just easy to underestimate when you are excited.
You Already Have What It Takes
Read that heading again. You do.
Every homesteader you admire started right where you are now. They had questions. They had doubts. They had a lot less knowledge than they wanted. They started anyway. They planted something. They built something small. They came back the next morning. Then the next. Then the next.
That is the whole secret. Show up. Plant something. Learn one thing. Add another small project when the first one feels steady. Within a few seasons, you will look up and realize you built a real homestead with your own hands, in the spaces you carved out of an ordinary life.
Start where you are. Use what you have. Plant something this week. If you want a personalized planting plan to tell you exactly what to start and when, our planting calendar is ready when you are.
We are glad you are here. Now go begin.
Frequently Asked Questions
You can begin in a single weekend. A few raised beds, a soil test, and a packet of seeds is all it takes for week one. A full first year usually covers a working garden, a small flock of hens, and one preservation skill. Building a deeply self sufficient homestead is a multi year arc, often five years or more, but the start is fast.
A backyard garden can be started for under $200 with seeds, soil amendments, and a few simple beds. A small homestead with a starter flock, fencing, and preservation gear typically runs $1,500 to $5,000 in year one. Acreage projects climb fast from there. Match your scale to your real budget, and add a 15 percent buffer for surprises.
No. Many modern homesteaders start in apartments and rentals. You can grow herbs and salad greens on a sunny windowsill, ferment vegetables, bake sourdough, and learn canning in any kitchen. These skills travel with you when you do find land, and they prove your commitment in the meantime.
Renters can homestead in real ways. Container gardens, balcony herbs, indoor sprouts, fermenting, and bulk pantry building all work in rentals. Talk to your landlord before adding raised beds or animals. Many landlords are open to gardens once they see the upgrade in curb appeal. Skills you build now compound when you eventually own.
Yes. Winter is one of the best times to begin. You can plan your garden, order seeds, take a sourdough class, build raised beds in the garage, organize a pantry, and study local laws. Hands on outdoor work picks up in early spring. Use the cold months for planning, learning, and small indoor projects.
Start with the garden. A garden teaches you about your soil, your weather, and your work habits at low cost. Chickens are wonderful but they are a daily commitment, and they go better when you already have rhythms in place. Add a small flock in your second season after the garden feels steady.
Trying to do too much in year one. Buying livestock before infrastructure is ready, planting twenty crops you have never grown, and stretching the budget too thin all come from the same source. Pick one headline project, protect it, and add the rest in seasons to come. Simple, slow, steady wins this game.

Cole
Founder & Lead Researcher
Cole is the founder of Plan Your Homestead. He works in clinical research and brings a research-first lens to every guide on the site, drawing on a long family line of farmers for grounded, practical perspective.
More in Guides
More articles coming soon. Check back for new guides content.