Goats are tough little animals, but they hate two things above all else. They hate getting wet, and they hate a cold draft. Give your herd a dry, snug place to get out of the rain and wind, and they stay healthy, calm, and happy. Skip the shelter and you invite pneumonia, foot rot, and a lot of vet bills.
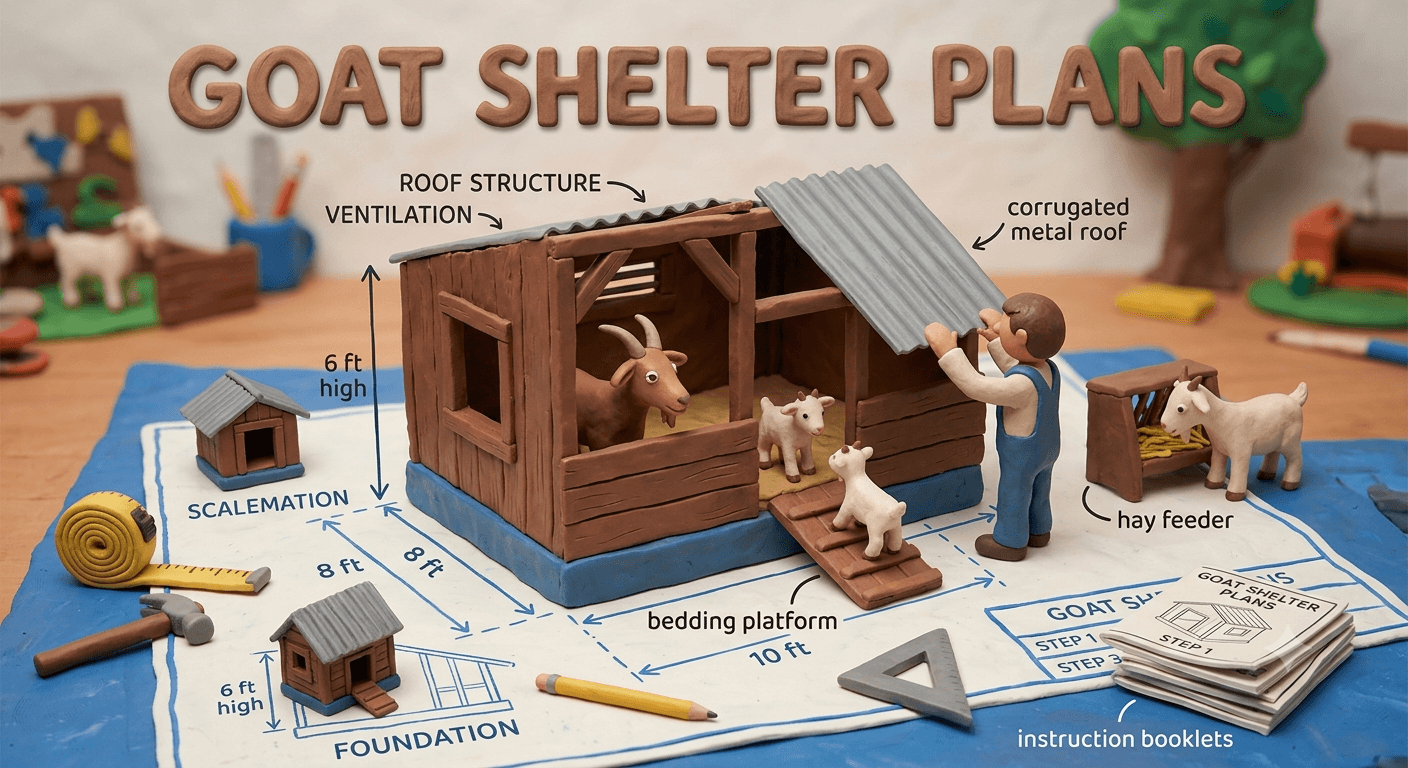
This guide walks you through the whole job in plain language. You will learn what a good goat shelter actually needs, how the main shelter types compare, and how to build a sturdy 8 by 6 foot wood frame goat house with a metal roof, a raised bedding platform, and a built in hay feeder. We will cover siting, materials, tools, a full cost breakdown, and the mistakes that trip up first time builders. Grab a coffee and let us get into it.
What a Goat Shelter Needs
A goat shelter does not need to be fancy. It needs to do a handful of simple jobs well. Get these right and your goats will thrive.
A good shelter stays dry. A leaky roof or a wet floor is the fastest way to a sick goat. It blocks wind and rain. Goats can handle cold far better than they handle a wet, blowing draft. It breathes. Fresh air has to move through the shelter so ammonia from urine and bedding does not build up and damage their lungs. It keeps them off the ground. A raised, bedded floor keeps hooves dry and helps prevent foot rot.
Size matters too. Plan on about 15 to 20 square feet of shelter space per standard goat, and a bit less for small breeds like Nigerian Dwarfs. An 8 by 6 foot shelter gives you 48 square feet, which comfortably houses two to three full size goats or three to four miniature goats. Crowd them and you get fights, dirty bedding, and stress.
One last point. A shelter is for getting out of the weather, not for locking goats up tight. Goats do best with free access to come and go as they please, so they can choose shade, shelter, or sunshine on their own.
Goat Shelter Types Compared
There is no single best goat shelter. The right one depends on your climate, your budget, how many goats you keep, and how much you want to build. Here are the four types most homesteaders choose from.
Three-Sided Run-In Shed
A run-in shed is a simple shelter with three walls and one open side. Goats wander in and out freely, and the open side faces away from the wind.
- Pros. Simple and cheap to build. Great airflow. Goats never feel trapped. Easy to clean with the open front.
- Cons. Less protection in driving rain or hard winters. No lockable space for kidding or predators.
- Best for. Mild and moderate climates, and herds that range on pasture during the day.
A-Frame or Hoop Shelter
A small A-frame hut or a cattle panel hoop covered with a tarp makes a quick, portable shelter. You can drag it to fresh ground or tuck it in a corner of the pen.
- Pros. Cheapest and fastest option. Light enough to move. Good for a goat or two.
- Cons. Limited room and headroom. Tarps and light frames wear out fast. Tippy if goats climb on top, and they will.
- Best for. A small herd, a tight budget, or a temporary shelter while you build something better.
Wood Frame Barn-Style
A framed shelter built from lumber and board siding, with a sloped metal roof, a raised bedding floor, and a partly open or doored front. This is the build we walk through below.
- Pros. Sturdy, warm, and long lasting. Plenty of room to add a hay feeder, a kidding stall, or storage. Friendly to anyone with basic carpentry skills.
- Cons. Costs more and takes a weekend or two. Heavier and harder to move once it is up.
- Best for. Homesteaders who want a real, permanent goat house and a project they can build with common tools.
Repurposed Shed or Stall
An old garden shed, a horse stall, or a corner of an existing barn converted for goats. You add bedding, a hay feeder, and good ventilation.
- Pros. Cheap or free if you already have the structure. Fast to set up.
- Cons. Often poorly ventilated or too closed in. May need a new floor or air vents added.
- Best for. Thrifty homesteaders with a sound, dry outbuilding already on hand.
Tip
If you want a goat shelter that does everything and lasts for decades, build a wood frame barn-style house with a sloped metal roof and a raised bedding floor. You get real weather protection, room to grow, and the option to add a kidding stall or storage later. That is the build we walk through below, and the carpentry skills carry over to every other shelter on this list.
Planning Your Goat Shelter
A little planning up front saves you a lot of grief later. Spend an afternoon on these steps before you cut a single board.
- Pick high, dry ground. Set the shelter on the highest, best drained spot in the pen. Goats and mud do not mix, and a dry base keeps the floor and hooves healthy.
- Face the open side away from the wind. Point the open front or door away from your prevailing winter wind. In most areas that means facing south or east. This blocks the worst weather while still letting air move.
- Size it to your herd. Plan on 15 to 20 square feet per full size goat. The 8 by 6 foot plan below suits two to three standard goats or a small herd of miniatures.
- Build it off the ground. A raised floor or a gravel pad under the shelter keeps water out and bedding dry. We build a raised slat platform inside for exactly this reason.
- Plan for ventilation. Leave a vented gap up high under the roof so warm, damp, ammonia heavy air can escape. Goats need fresh air far more than they need a sealed box.
- Tie it into your fencing. A shelter is only as safe as the fence around it. Pair this build with solid, escape proof fencing so your herd stays put and predators stay out. See our goat fencing guide for the full rundown.
- Check local rules. Some areas have setback rules or permit requirements for livestock structures. A quick call to your local office before you build saves headaches later.
Choosing Your Materials
The materials you pick decide how long the shelter lasts and how safe it is for your goats. Goats chew, rub, and climb on everything, so build it tough. Here are the choices that matter most.
The Frame
Build the frame from standard 2x4 lumber. You can use untreated softwood for the walls and rafters to keep costs down. For the few posts or skids that touch the ground, use pressure treated lumber so the base does not rot.
Warning
Goats nibble and chew on wood, so keep pressure treated lumber out of reach where they can gnaw on it. Use treated wood only for ground contact skids and posts, and face the inside of the shelter with untreated boards. Never let goats lick or chew treated surfaces, and skip any wood with peeling paint or old finishes, since the chips can make them sick.
The Siding
Cover the walls with solid board siding, plywood, or shiplap. Goats love to rub and headbutt walls, so fasten everything securely and avoid thin, flimsy panels that crack. Smooth the inside so there are no sharp edges or splinters at goat height.
The Roof
Top the shelter with corrugated metal roofing on a clear slope. Metal sheds rain and snow fast, lasts for decades, and stands up to goats far better than shingles, which they will pick at. Pitch the roof so water runs off the back, away from the open front, and let it overhang the walls a few inches to throw water clear.
The Bedding Platform
Build a raised bedding platform from 2x4 framing topped with deck boards spaced a small gap apart. The gap lets moisture and droppings fall through and keeps the bedding surface dry. Top it with a thick layer of straw or wood shavings for a warm, dry bed. Goats love a raised perch to lounge on, and it keeps them up off any damp.
The Hay Feeder
A built in hay feeder keeps hay off the floor, where goats waste it and foul it. A simple slatted rack or a keyhole feeder mounted on an inside wall lets goats pull hay through without climbing in and wasting it. Clean hay means healthier goats and less money down the drain. Learn what to put in it with our goat feeding and nutrition guide.
Tools You Will Need
Most of these live in a typical home workshop.
- Tape measure, chalk line, and a carpenter's square
- 4 ft level and a torpedo level
- Circular saw and a handsaw
- Cordless drill and impact driver
- Hammer or a framing nailer
- Metal snips for cutting roofing
- Post hole digger or a shovel for skids and leveling
- Speed square and a pencil
- Safety glasses, work gloves, and ear protection
A few optional items speed the job along.
- A miter saw for clean, repeatable cuts
- A laser level for setting the base
- A nut driver bit for roofing screws
Materials List and Cost Breakdown
Costs are approximate, based on average United States prices in 2026, for an 8 by 6 foot wood frame goat shelter with a sloped corrugated metal roof, a raised bedding platform, and a built in hay feeder. The budget column assumes rough or salvaged lumber and reclaimed roofing. Your total swings most with the siding and roofing you choose.
| Item | Quantity | New Cost | Budget Cost |
|---|---|---|---|
| Pressure treated 4x4 skids | 3 | $60 | $45 |
| Untreated 2x4 framing lumber | 20 | $150 | $100 |
| Plywood or board siding | 200 sq ft | $220 | $130 |
| Deck boards for bedding platform | 12 | $90 | $55 |
| Corrugated metal roofing | 60 sq ft | $120 | $70 |
| Roofing screws and fasteners | 1 lot | $40 | $30 |
| Hinges, latch, and door hardware | 1 set | $35 | $25 |
| Hay feeder slats and hardware | 1 lot | $40 | $25 |
| Gravel for base pad | 1 lot | $50 | $30 |
| Total for an 8x6 ft goat shelter | ~$805 | ~$510 |
That gets you a real, lasting goat house for far less than a prefab barn or shed of the same size, which easily runs $1,500 or more. Use rough sawn or salvaged lumber and reclaimed roofing and the price drops fast.
Step by Step Build Instructions
Plan on a weekend or two with two people. The base and frame go up in a day, then you sheath, roof, and fit out the inside.
Step 1: Set a Level Base
Mark out an 8 by 6 foot footprint on high, well drained ground. Lay a gravel pad for drainage, then set three pressure treated 4x4 skids running the long way, spaced evenly across the width. Level the skids to each other. A flat, dry base keeps the whole shelter from rocking and rotting.
Step 2: Build the Floor Frame
Build a 2x4 floor frame on top of the skids, like a simple deck frame, with joists every 16 inches. Square it up and fasten it down to the skids. This frame ties the base together and carries the raised bedding platform you build later.
Step 3: Frame the Walls
Build four wall frames from untreated 2x4 lumber. Make the back wall taller than the front so the roof will slope to shed water off the back. Frame an opening on the front for a wide doorway or an open side. Stand the walls up, square and plumb them, and screw the corners together. Add a top plate around all four walls to tie the frame and carry the roof.
Step 4: Sheath the Walls
Cover the frame with plywood or board siding. Run the boards tight and fasten them well, since goats will rub and headbutt the walls hard. Keep the inside smooth with no sharp edges or protruding screws at goat height. Leave a vented gap a few inches tall along the top of the side walls, just under the roofline, for airflow.
Step 5: Install the Sloped Metal Roof
Set 2x4 rafters from the tall back wall down to the lower front wall so the roof slopes to the back. Sheath if you like, then screw down corrugated metal roofing with roofing screws and rubber washers. Overhang the metal a few inches past the walls to throw water clear of the shelter and bedding.
Warning
Make sure the vented gap under the roof stays open and clear. Goats give off a lot of moisture, and bedding gives off ammonia. A sealed, stuffy shelter leads straight to coughing, pneumonia, and runny eyes. You should never smell sharp ammonia inside. If you do, add more ventilation right away.
Step 6: Build the Raised Bedding Platform
Inside the shelter, build a low platform from 2x4 framing topped with deck boards. Leave a small gap between the boards so moisture and droppings fall through. Set it a few inches off the floor along one wall. Top it with a thick layer of straw or shavings. This raised bed keeps your goats warm, dry, and off any damp floor.
Step 7: Hang the Door and Build the Hay Feeder
If you want a closeable shelter for kidding or predator nights, build a simple wood door and hang it on strong hinges with a goat-proof latch. Then mount a slatted hay feeder or a keyhole rack on an inside wall at goat chest height. Goats pull hay through the slats without climbing in and wasting it.
Step 8: Bed It Down and Settle the Herd
Spread a deep, clean layer of straw or shavings over the bedding platform and floor. Let your goats explore the new shelter on their own. Watch how they use it for a few days, and adjust the feeder height or add bedding as needed. A little fine tuning now makes for a happy herd.
The goat shelter is done.
Tips for a Long Lasting Goat Shelter
A few habits separate a shelter that lasts decades from one that rots or falls apart in a few years.
- Keep the bedding deep and dry. Add fresh straw on top and clean it out before it packs down and turns sour. Many homesteaders use the deep litter method through winter, then do a full cleanout in spring.
- Mind the ventilation year round. Resist the urge to seal the shelter up tight in winter. Goats need fresh air more than they need a warm box. Block the wind, not the airflow.
- Check for chew damage. Goats gnaw on wood. Walk the shelter now and then and refasten or replace any boards they have worked loose.
- Clear water away. Keep gutters, grading, and the gravel pad working so rain drains away from the shelter, not under it.
- Skip the heat lamp. Heat lamps are a leading cause of barn fires. Healthy goats with deep bedding and a draft-free shelter handle cold just fine without one.
Common Mistakes to Avoid
A few traps catch nearly every first time builder. Sidestep these and your goat shelter will serve you for years.
- Sealing it up too tight. A closed, stuffy shelter traps ammonia and moisture and makes goats sick. Always leave a vented gap up high.
- Building on low, wet ground. Mud and standing water lead to foot rot and dirty bedding. Set the shelter on the highest, driest spot you have.
- Making it too small. Crowded goats fight, foul their bedding, and get stressed. Give each goat 15 to 20 square feet of room.
- Using thin or flimsy walls. Goats rub, climb, and headbutt. Light panels crack and fail. Build it sturdy and fasten everything well.
- Leaving treated wood within reach. Goats chew on wood. Keep pressure treated lumber to ground contact only and face the inside with untreated boards.
- Feeding hay on the floor. Hay on the ground gets fouled and wasted. Mount a slatted feeder so goats pull clean hay through the slats.
- Using a heat lamp. Heat lamps start barn fires. Deep bedding and a draft-free shelter keep goats warm without the risk.
Frequently Asked Questions
Frequently Asked Questions
Plan on about 15 to 20 square feet of shelter space per standard size goat, and a bit less for small breeds like Nigerian Dwarfs. An 8 by 6 foot shelter gives you 48 square feet, which comfortably houses two to three full size goats or three to four miniature goats. Goats also need outdoor pasture or pen space beyond the shelter, since the shelter is just for getting out of the weather. Crowding goats leads to fights, dirty bedding, and stress, so size up if your herd will grow.
An 8 by 6 foot wood frame goat shelter with a sloped metal roof, a raised bedding platform, and a built in hay feeder runs about $510 to $805 in materials when you build it yourself, depending on the siding and roofing you choose. A simple three-sided run-in shed or an A-frame hut costs much less, often under $200. Using rough sawn or salvaged lumber and reclaimed roofing keeps the cost at the low end. A comparable prefab barn or shed easily runs $1,500 or more, so building it yourself saves real money.
No. Healthy goats handle cold weather very well as long as they have a dry, draft-free shelter and deep, clean bedding. What hurts goats is wet, blowing wind and damp bedding, not cold air itself. Skip the heat lamp, since heat lamps are a leading cause of barn fires and goats rarely need them. Just block the wind, keep the bedding deep and dry, and make sure the shelter still has good ventilation up high so moisture and ammonia can escape.
A run-in shed is a simple three-sided shelter with one open side that goats wander in and out of freely. It is cheap, airy, and great for mild to moderate climates. A barn-style goat house is fully framed with four walls, a sloped roof, and often a door, giving more protection in hard winters and room to add a kidding stall or storage. Many homesteaders start with a run-in and build a barn-style shelter later as their herd grows.
Goats give off a lot of moisture from breathing, and their urine and bedding release ammonia. In a sealed, stuffy shelter that damp, ammonia heavy air builds up and damages their lungs, leading to coughing, runny eyes, and pneumonia. A vented gap up high under the roof lets that bad air escape while still blocking wind at goat level. You should never smell sharp ammonia inside the shelter. If you do, add more ventilation right away.
Keep goats up off bare, damp ground. A raised slatted platform or a well drained gravel base works best, topped with a thick layer of straw or wood shavings. Straw is warm and cheap, while shavings absorb more moisture. Many homesteaders use the deep litter method through winter, adding fresh bedding on top and cleaning it all out in spring. Whatever you use, keep it dry, since wet bedding causes foot rot and disease.
Ready to Build Your Goat Shelter?
That is the full picture. You know what a good goat shelter needs, how the main types compare, and you have a step by step plan for an 8 by 6 foot wood frame goat house you can build yourself. A solid shelter is the foundation of a healthy herd, and it pays you back every wet, windy night your goats stay warm and dry.
When the shelter is up, finish the setup. Keep your herd safe and put with our goat fencing guide, feed them right with our goat feeding and nutrition guide, and spot trouble early with our goat health guide. New to goats altogether? Start with our raising goats for beginners guide, or learn why Nigerian Dwarf goats thrive on small properties.
For more weekend projects, browse the full DIY hub.
Happy building, and happy homesteading.

Cole
Founder & Lead Researcher
Cole is the founder of Plan Your Homestead. He works in clinical research and brings a research-first lens to every guide on the site, drawing on a long family line of farmers for grounded, practical perspective.
More in DIY
More articles coming soon. Check back for new diy content.