The sun dries clothes on a line, lumber in a yard, and hay in a field. With one weekend and a little plywood, it can dry your tomatoes, apples, and herbs too. A solar dehydrator turns free sunlight into preserved food, no electric bill required.
This guide walks you through building a simple direct solar dehydrator from scratch. You will get a clear materials list, a full step by step build, and the basic plumbing of airflow that turns a glass topped box into a real food preservation tool. Total cost runs about $80 to $150 depending on what you can scrap together.
I built mine on a quiet Saturday in early summer. The first batch I dried was a tray of cherry tomatoes from the garden, and they came out so good I ate half of them right off the screen. If you grow your own food and you want to put it up without running an electric dehydrator for six hours, this is the project for you.
If you also want a place to grow what you will dry, take a look at our free raised garden bed plans. Otherwise, grab your tape measure and let us get into it.
What Is a Solar Dehydrator?
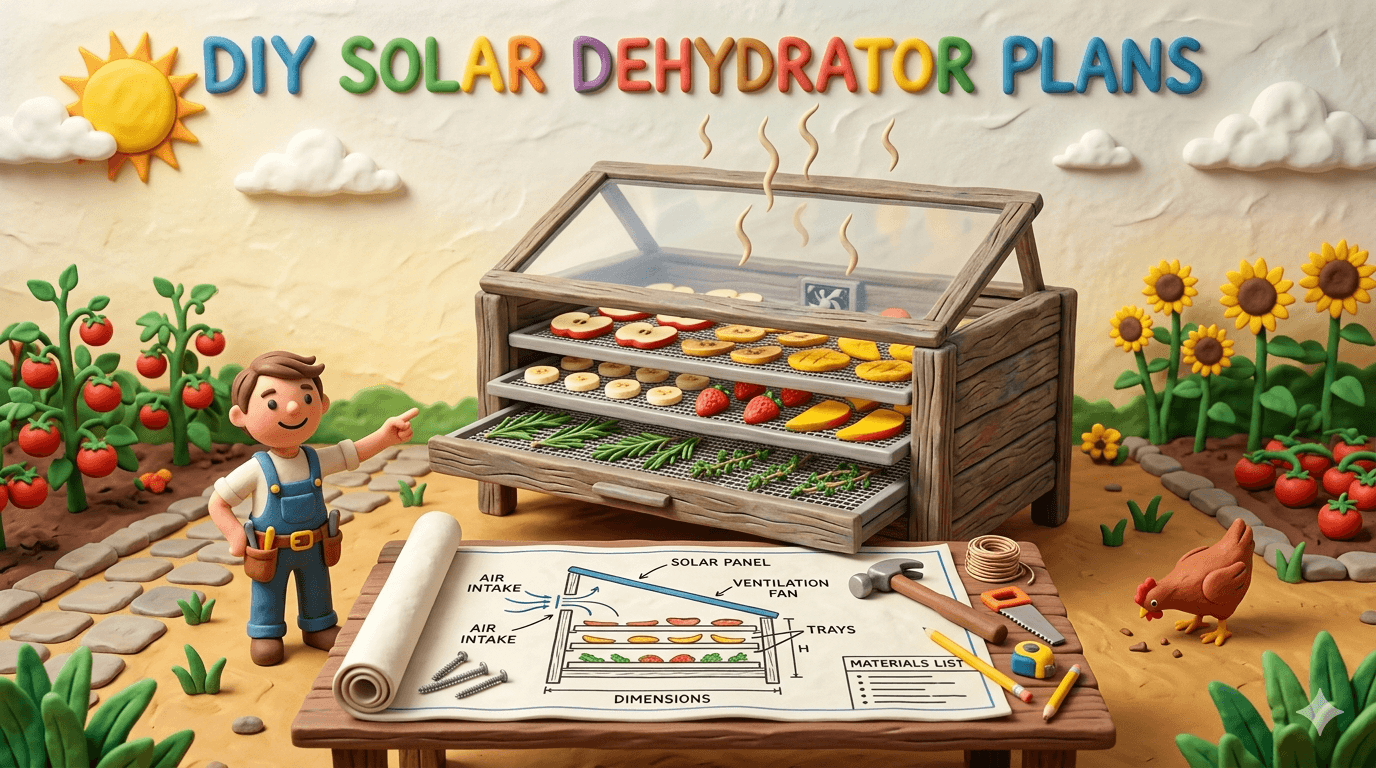
A solar dehydrator is an insulated box with a clear top that uses sunlight to gently heat air and dry food. Sun shines through the glazing, the air inside warms up, and warm air rises through trays of sliced food, carrying the moisture out through vents in the top.
There are no fans, no heating elements, and no plugs. Done right, the box holds an internal temperature of 130 to 145 degrees Fahrenheit on a sunny day. That is the sweet spot for drying most fruits, vegetables, and herbs without cooking them.
The whole system has four basic parts. A tilted glazing on top that lets the sun in. An insulated chamber that traps heat. A set of stacked screen trays that hold the food. And vents at the bottom and top that pull cool air in and push warm moist air out.
Get those four right and you have a dehydrator that just works.
Why Build a Solar Dehydrator?
A small solar dehydrator looks humble, but the payoff stacks up fast.
- Free energy. The sun is the heat source. Every batch you dry is one you do not pay for.
- No electricity required. Perfect for off grid setups, power outages, or anyone who hates the hum of a kitchen appliance for eight hours.
- Better flavor. Slow, low temperature drying preserves more aroma in herbs and more sugar in fruit than a hot electric unit.
- Big batch capacity. A homemade box holds three or four trays. That is a lot more food than a counter top dehydrator.
- Garden to pantry in one day. Pick in the morning, slice, load, and pull dried goods out by sunset.
- A real food independence step. Dehydrated food keeps for months without canning, freezing, or refrigeration.
If you grow even a modest garden, the build pays for itself in a single tomato season.
Direct vs. Indirect Designs (and Why We Are Building Direct)
There are two common solar dehydrator styles, and it helps to know the difference before you cut wood.
A direct solar dehydrator is one box. The food sits inside, the sun shines on it through the glazing, and the same box collects heat and dries the food. It is simple, fast to build, and works great for most foods. The tradeoff is that direct sunlight can fade colors and reduce vitamin C in some delicate fruits and herbs.
An indirect solar dehydrator uses two boxes. A separate solar collector heats air and pipes that warm air into a shaded drying chamber. The food never sees direct sun, which preserves color and nutrients better. The tradeoff is twice the lumber, twice the build time, and a much larger footprint.
For a first build, the direct design is the right call. It is cheap, it works, and you can wrap it up in a weekend. If you decide later that you want the indirect setup for delicate herbs or chili peppers, you will already have the skills to build one.
This guide covers the direct design only.
Will a Solar Dehydrator Work in Your Climate?
You do not need to live in Arizona for this to work. You do need three things.
- Direct sun for at least 5 to 6 hours a day during your drying season. Most of the United States gets this from late spring through early fall.
- Low to moderate humidity, ideally below 60 percent. High humidity slows drying and raises the risk of mold. If you live in a humid climate, plan to dry on the driest, sunniest days of the week.
- Daytime air temperatures above 70 degrees Fahrenheit. Cooler air still works, but drying takes longer.
Foods that dry beautifully in a solar dehydrator include tomatoes, peppers, apples, pears, plums, grapes (raisins), figs, herbs, mushrooms, zucchini, and citrus peel. Meats and jerky are possible, but they require more care and a faster, hotter drying environment for food safety. We will cover that in the FAQ.
Tools You Will Need
This is a beginner friendly build. Here is the short list:
- Cordless drill with a full bit set
- Circular saw or jigsaw
- Hand saw or miter saw (clean crosscuts on framing)
- Tape measure, pencil, and combination square
- Carpenter's level
- Staple gun
- Caulk gun
- Tin snips (for the vent screen)
- Clamps (two or three)
- Sandpaper or random orbital sander
- Heavy work gloves
- Safety glasses
A second pair of hands helps when you set the glazing, but you can do the whole build solo if you take your time.
Materials List and Cost Breakdown
Costs are approximate and assume you are buying new at a standard hardware store. Salvaged materials drop the total fast.
| Item | Quantity | Approx. Cost |
|---|---|---|
| 1/2 in exterior plywood (4 ft x 8 ft sheet) | 1 | $35 to $55 |
| 2x2 furring strips (8 ft) | 4 | $16 |
| 1x2 trim boards (8 ft) | 4 | $14 |
| Tempered glass or twin wall polycarbonate (24 in x 36 in) | 1 | $25 to $50 |
| 1/4 in food grade aluminum or fiberglass screen, 18 in x 36 in | 4 yards | $10 |
| Foil faced rigid foam insulation (1/2 in, 2 ft x 4 ft) | 1 | $12 |
| Flat black high heat exterior paint (quart) | 1 | $12 |
| Exterior wood screws (1 1/4 in and 2 in) | 1 box each | $14 |
| Stainless steel mesh, 6 in x 24 in (vents) | 1 | $6 |
| Weather stripping (foam tape, 17 ft roll) | 1 | $7 |
| Hinges and latch | 1 set | $10 |
| Exterior silicone caulk | 1 tube | $7 |
| Wood glue | 1 small bottle | $5 |
| Total | ~$80 to $150 |
If you have scrap plywood and can source a piece of tempered glass from a torn out storm door, you can finish the build for under $50. Habitat for Humanity ReStores are a great place to look.
How to Pick the Right Glazing, Screen, and Lumber
A few materials choices make a real difference in how well the dehydrator performs and how long it lasts.
Glazing. Tempered glass is the most durable option and holds heat well. Twin wall polycarbonate is lighter, much cheaper to ship, and almost unbreakable, but it does scratch over time. Avoid plain window glass, which can crack in fast temperature swings. Avoid plastic sheeting, which sags and cuts the working life of the build to a single season.
Screen. Use food grade fiberglass or food grade aluminum mesh, not standard window screen. Standard window screen often has a coating that can leach into food at warm temperatures. Stainless steel hardware cloth (1/4 in) works for the vent screens because no food touches it.
Lumber. Stick with exterior rated plywood and untreated softwood for the framing. Pressure treated lumber contains preservatives you do not want near food. The inside of the box gets painted flat black anyway, which seals the wood.
Tip
The single biggest performance upgrade is painting the entire interior of the box (back wall, side walls, floor) flat black with a high heat exterior paint. Black soaks up sunlight and turns it directly into heat, raising the internal temperature by 15 to 25 degrees on a sunny day.
Good places to source materials:
- Habitat for Humanity ReStore (glazing, lumber, hinges)
- Local glass shops (tempered cuts and offcuts)
- Big box garden center (polycarbonate panels)
- Estate sales and Facebook Marketplace (storm doors with usable glass)
- Restaurant supply stores (food grade fiberglass mesh)
Step by Step Build Instructions
Plan on a relaxed Saturday and Sunday. Saturday is cutting and assembly. Sunday is paint, glazing, and trays. Most of the time goes into measuring carefully, not building.
The finished box in this guide is roughly 24 inches deep, 36 inches wide, and 18 inches tall at the back, sloping down to 12 inches at the front. The glazing tilts about 15 degrees, which works well for most of the lower 48.
Step 1: Cut the Box Panels
Lay your sheet of plywood on a pair of sawhorses. Measure carefully and mark the cut lines with a pencil and square.
Cut the following pieces:
- Back panel: 36 in wide x 18 in tall
- Front panel: 36 in wide x 12 in tall
- Two side panels: 24 in deep, with the back edge 18 in tall and the front edge 12 in tall (this gives the glazing its tilt)
- Bottom panel: 36 in wide x 24 in deep
Use a circular saw with a straight edge clamped as a guide for clean, square cuts. Sand all edges smooth. Set the panels aside.
Step 2: Assemble the Insulated Chamber
Stand the back panel on edge and run a bead of wood glue along the bottom edge. Set it onto the back edge of the bottom panel and clamp.
Drive 2 in exterior screws every 6 inches along the seam from the underside of the bottom panel up into the back. Repeat with the front panel and both side panels until the box is fully assembled.
Cut your foil faced rigid foam insulation to fit the inside of all four walls and the bottom of the box. Attach it foil side facing into the box with a few small dabs of construction adhesive. The foam keeps heat inside the chamber on cooler days and on cloudy afternoons.
Run a bead of exterior silicone caulk around every interior seam. Air leaks waste heat. A well sealed box runs 10 to 15 degrees hotter than a leaky one.
Step 3: Build the Tilted Glazing Frame
The glazing frame is a simple rectangle of 2x2 furring that holds your glass or polycarbonate panel. It sits on top of the box and tilts with the slope of the side panels.
Cut two 2x2 pieces 36 inches long (front and back rails) and two 2x2 pieces 24 inches long (side rails). Assemble the rectangle with 2 in screws and a dab of glue at each corner. Check for square with a tape measure across the diagonals.
Lay your glazing on top of the frame and trace the outline. Cut a rabbet (a shallow ledge) along the inside edge of the frame so the glazing sits flush. If you do not want to cut a rabbet, you can install thin 1x2 stops on top of the frame to hold the glazing in place.
Run a bead of clear silicone around the seat where the glazing will rest. Set the glazing into place. Press it down firmly until the silicone squeezes out slightly, then wipe the excess with a damp rag.
Attach the glazing frame to the top of the box with two 2 in hinges along the back edge. The frame should swing up and back like a chest lid for loading and unloading trays. Add a simple hook and eye latch on the front.
Step 4: Install Vents and Screen Tray Supports
Airflow is the difference between drying food and steaming it. You need cool air coming in low and warm moist air going out high.
Cut a row of three 2 inch round vent holes along the very bottom of the front panel. Use a 2 inch hole saw. Cover each hole on the inside with a square of stainless steel mesh, stapled in place. These are your intake vents.
Cut a matching row of three 2 inch round vent holes along the very top of the back panel, just under the glazing frame. Cover each with stainless mesh on the inside. These are your exhaust vents.
Now install the tray supports. Cut eight 1x2 trim boards to 22 inches long (the inside depth of your box). Inside the box, screw four pairs of these supports into the side walls at evenly spaced heights, roughly 4 inches apart. The trays will rest on these like shelves in an oven.
Tip
Slope the tray supports downward toward the back of the box at about a 1 inch drop over the 22 inch run. Warm air rises along the back wall and exits through the top vents, which pulls moisture-heavy air up and out efficiently. Sloping the trays slightly helps that current move.
Step 5: Build the Food Safe Drying Trays
The trays hold your food on a screen so warm air flows around every slice.
For each tray, cut four pieces of 1x2 to make a frame. Two pieces 22 inches long, two pieces 30 inches long. Assemble each frame with 1 1/4 in screws and a little wood glue at each corner. Check for square.
Cut a piece of food grade fiberglass or aluminum mesh slightly larger than the frame. Lay the mesh over the frame and pull it tight. Staple it to the underside of the frame with a staple every inch around the perimeter. Trim the excess mesh flush with a pair of scissors or tin snips.
Build three or four trays this way. Three is the comfortable max for the box dimensions in this guide. Four works if you slice food thin and load lightly.
Step 6: Paint, Seal, and Final Assembly
Set the box and trays out in a shaded area. Lightly sand any rough spots, then wipe the surfaces clean.
Paint the entire interior of the box (back, sides, floor, and the inside of the front panel) with two coats of flat black high heat exterior paint. This is what turns the box into a solar collector. Do not skip a second coat.
Paint the exterior with any color of exterior paint you like. A lighter color reflects extra heat away from the outside but darker tones are fine in cooler climates. The trays do not need paint. Seal them with a coat of food safe mineral oil if you want extra weather resistance.
Apply foam weather stripping along the top edge of the box, where the glazing frame meets the box. This seals the lid and keeps warm air from escaping at the seam.
Reinstall the glazing frame on its hinges. Test that it opens and closes cleanly and that the latch holds. Slide your trays in. The build is done.
Set the dehydrator outside in full sun and let it bake empty for one full day. This cures any paint smell, drives off any leftover wood glue vapors, and gives you a chance to read the internal temperature with an oven thermometer. You should see 130 to 150 degrees Fahrenheit on a sunny 80 degree day. If you do not, check for air leaks.
How to Use Your Solar Dehydrator
A few simple habits get the best results.
Site it well. Place the box on a stable surface in full sun. The glazing should face south (or as close as you can get). A picnic table, a pair of sawhorses, or a sturdy patio works.
Slice food thin and uniform. Aim for 1/4 inch slices for fruits and vegetables. Thin and even pieces dry at the same rate. Thick or uneven slices can leave wet spots that mold.
Pretreat fruits if you want them to stay bright. A quick dip in lemon juice or ascorbic acid water keeps apples and pears from browning. Skip if you do not mind the rustic look.
Load the trays with space between pieces. Air has to flow around every slice. Crowding the trays slows everything down and risks uneven drying.
Rotate trays once or twice during the day. The bottom tray dries fastest. Swap it with the top tray midway through the day for even results.
Bring trays in at night. Once the sun drops, the box loses heat and humidity creeps back in. Pull the trays inside, then load them again at sunrise if drying is not finished.
Aim for crisp, leathery, or brittle textures. Fruit should be leathery with no wet spots. Vegetables should be crisp. Herbs should crumble between your fingers. If a slice still bends without snapping, give it more time.
Drying Times for Common Foods
Times vary with humidity, slice thickness, and the angle of the sun. Use these as a starting point.
| Food | Slice Thickness | Approx. Drying Time |
|---|---|---|
| Cherry tomatoes (halved) | n/a | 1 to 2 sunny days |
| Sliced tomatoes | 1/4 in | 1 to 2 sunny days |
| Apples | 1/4 in rings | 1 sunny day |
| Pears | 1/4 in slices | 1 to 2 sunny days |
| Bananas | 1/4 in coins | 1 sunny day |
| Bell peppers | 1/4 in strips | 1 sunny day |
| Hot peppers (whole) | n/a | 2 to 3 sunny days |
| Zucchini | 1/4 in rounds | 1 sunny day |
| Mushrooms | 1/4 in slices | 1 sunny day |
| Fresh herbs (basil, oregano, mint) | whole leaf | 4 to 8 hours |
| Citrus peel | 1/8 in strips | 1 sunny day |
| Grapes (halved) | n/a | 3 to 4 sunny days |
If clouds roll in, pull the trays inside and finish in the oven on the lowest setting. The food will not be ruined, just slow.
Maintenance and Care
A solar dehydrator is a low maintenance tool, but a little care keeps it working for years.
- Wipe the glazing inside and out at the start of each drying season. Dust on the glass blocks 10 to 15 percent of the sunlight.
- Check the foam weather stripping every spring and replace it if it has compressed or cracked.
- Inspect the screen on every tray for tears or food residue. Replace damaged sections.
- Touch up the flat black interior paint every two to three years.
- Store the dehydrator under cover during the off season. The glazing fades and the wood weathers fast in winter weather.
- Tighten any loose screws on the glazing frame and the latch each spring.
With basic upkeep, the box will run for 8 to 10 years before any major rebuild.
Common Mistakes to Avoid
A few traps to watch for, especially on your first build:
- Skipping the flat black interior paint. A bare wood interior runs 20 degrees cooler than a painted one. The box still works, just much slower.
- Cutting too few vents. A sealed box with weak airflow steams food instead of drying it. Stick to three intake vents and three exhaust vents at minimum.
- Using regular window screen for trays. Most window screen is not food safe. Buy fiberglass or aluminum mesh labeled food grade.
- Loading trays too full. Pieces touching each other do not dry evenly. Leave airspace.
- Drying meat without proper safety steps. Solar drying jerky is possible but requires a fast start at higher temperatures than a passive solar box can guarantee. Pre cook the meat to 160 degrees Fahrenheit before solar drying. See the FAQ.
- Ignoring humidity. Trying to dry on a humid, overcast day is a recipe for mold. Wait for a sunny window.
- Letting trays sit out overnight. Cool, damp night air pushes moisture right back into your food. Always pull the trays inside at sunset if drying is not done.
Warning
A passive solar dehydrator is excellent for fruits, vegetables, and herbs. It is risky for raw meat. Bacteria can grow in the temperature range a solar box reaches. If you want to make jerky, fully cook the meat to 160 degrees Fahrenheit first, then finish drying it in the solar box. Do not solar dry raw meat.
Avoid these and your dehydrator will run for years with almost no fuss.
Frequently Asked Questions
Frequently Asked Questions
On a clear, 80 degree Fahrenheit day with full sun, a well sealed box with a flat black interior reaches 130 to 150 degrees Fahrenheit inside. On hotter, dryer days you may see 160 degrees. This is right in the sweet spot for drying fruits, vegetables, and herbs. Use an oven thermometer on the middle tray to verify.
Cloudy days are a hard no for solar drying. The box needs direct sun to heat up. Cool but sunny winter days can work for herbs and citrus peel, but most fruits and vegetables dry too slowly in winter and risk mold. Save heavy drying for late spring through early fall.
Only with extra steps. A passive solar box does not heat up fast enough to meet USDA food safety guidelines for raw meat. Pre cook strips of marinated meat in your oven at 160 degrees Fahrenheit for 10 minutes, then move them to the solar dehydrator to finish drying. This is the only safe way to make solar jerky.
Mold grows when food dries too slowly or stays warm and damp overnight. Slice food thin, leave air space between pieces, dry only on sunny low humidity days, and bring trays inside at sunset. Once dried, condition the food in a sealed jar for a few days and shake it daily. If you see condensation, it is not dry enough yet and needs more time in the dehydrator.
The box in this guide (24 in x 36 in x 18 in) holds three or four trays and dries about 5 to 8 pounds of fresh food at a time. That is plenty for a backyard garden. If you grow at homestead scale, build two boxes side by side rather than one big one. Smaller boxes hold heat better and are easier to move into the sun.
Yes, and it works well. A small 12 volt computer fan wired to a tiny solar panel runs only when the sun shines and can cut drying times by 30 to 40 percent. Mount the fan on the inside of the front intake vent so it pushes outside air into the box. This turns the build into a hybrid passive plus solar fan dehydrator.
Properly dried fruits and vegetables stored in airtight glass jars in a cool, dark pantry keep 6 to 12 months. Herbs keep 1 to 2 years. Vacuum sealing extends shelf life further. If a piece feels soft or sticky after a week in the jar, it was not fully dry. Pop it back in the dehydrator on the next sunny day.
A solar oven traps heat to cook food, often reaching 250 to 350 degrees Fahrenheit. A solar dehydrator uses both heat and steady airflow to remove moisture at a much lower temperature, around 130 to 145 degrees. The vents are the key difference. An oven seals heat in. A dehydrator lets warm moist air escape so food dries instead of cooking.
Ready to Build Your Solar Dehydrator?
That is the whole build. A weekend project, a modest budget, and a real path to putting up the harvest with nothing but sunlight. Once you trust your first dehydrator, you will probably find yourself drying everything from tomatoes to mint without thinking twice.
When you are ready to expand the food preservation system around it, take a look at our free raised garden bed plans, our DIY three bin compost system, and our simple rainwater catchment barrel. For more weekend builds, browse the full DIY hub.
Happy building, and happy drying.

Cole
Founder & Lead Researcher
Cole is the founder of Plan Your Homestead. He works in clinical research and brings a research-first lens to every guide on the site, drawing on a long family line of farmers for grounded, practical perspective.
More in DIY
More articles coming soon. Check back for new diy content.