So you bought the land and started asking around about waste. Maybe the realtor handed you a perc test result you cannot read. Maybe the county clerk slid a permit packet across the counter and said good luck. Or maybe a previous owner left a rusty lid in the yard and no map of what is buried under it. Whatever the path, the question is the same. How does a septic system actually work, and what do you have to do to keep it working for the next 30 years.
A septic system is the quiet workhorse of a rural homestead. Done right, it handles every drain in the house, costs almost nothing to operate, and runs for decades without thinking about it. Done wrong, it backs up into the basement, kills the lawn, contaminates the well, and costs five figures to fix. The gap between right and wrong is mostly knowledge, not money.
The good news is that septic is not complicated once you see the structure. Every conventional system in the country is built from the same handful of parts, in the same order, doing the same job. By the end of this guide you will know how a septic system works, how to size yours, what the alternatives cost, the maintenance rhythm that keeps it healthy, and the mistakes that kill drain fields. Grab a coffee. Let us walk through it together.
What a Homestead Septic System Actually Is
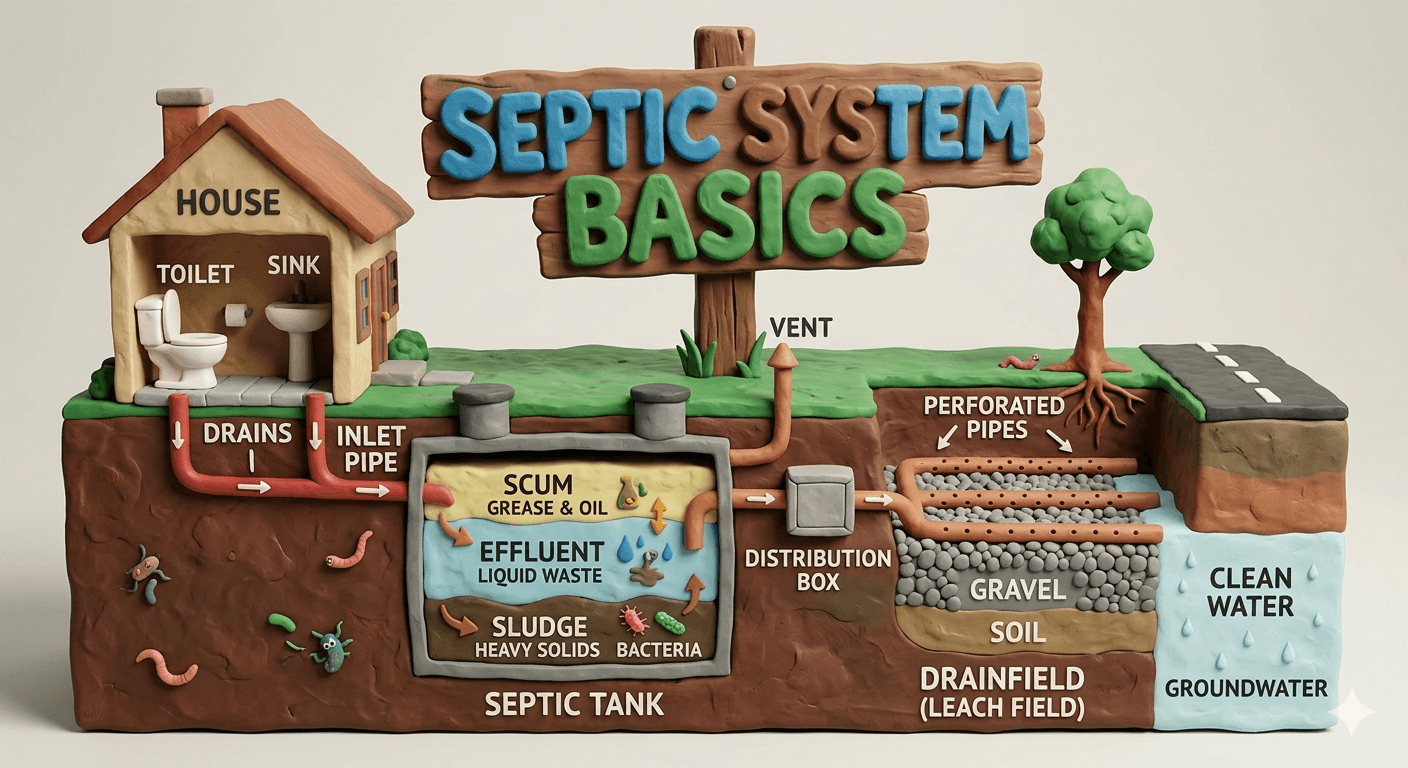
A septic system is an underground wastewater treatment plant for one house. Every flush, every sink, every shower, and every washing machine load drains into a buried tank. The tank holds the water long enough for solids to settle and grease to float. Clearer middle water flows out the other end into a drain field, where soil microbes finish the cleaning work and the water rejoins the groundwater.
The system has three working parts. A septic tank that separates and digests. A distribution box that spreads the flow. A drain field that releases treated water into the soil. Everything else is plumbing, lids, risers, and inspection ports.
A conventional septic system uses gravity from start to finish. The house sits above the tank. The tank sits above the distribution box. The distribution box sits above the drain field. No pumps, no electricity, no moving parts. That is why septic systems are so popular off grid. They keep working through ice storms, power outages, and busy summer weeks when the cabin is full of guests.
Most county codes call septic an On Site Wastewater Treatment System, or OWTS. The acronym shows up on permits and as built drawings. Same thing, just dressed up.
Why Septic Matters for an Off Grid Homestead
Septic is the cheapest reliable wastewater answer for rural land. A holding tank you pump every two weeks costs thousands of dollars a year forever. A municipal hookup is rarely an option past the last utility pole. A composting toilet handles bathrooms but does nothing about kitchen and laundry water. A septic system is the only setup that takes everything from one house and treats it on site for a few hundred dollars a year.
It is also the most forgiving. A properly sized septic system shrugs off a houseful of weekend visitors, a long shower, and a load of laundry running at the same time. The tank buffers the spike and the drain field releases it slowly over days. A pump or composting setup needs more babysitting.
There is also a real environmental case. Untreated wastewater carries bacteria, nitrogen, phosphorus, and pharmaceuticals. Dumping it on the ground or into a pit contaminates groundwater and surface water for miles. A working septic system removes 95 to 99 percent of pathogens before the water reaches the aquifer. Your downstream neighbors and your own well share the same groundwater, so this is not just paperwork.
And then there is the independence. A working septic system means the only utility you pay for waste is the occasional pump truck. No monthly sewer bill. No surprise rate hikes. No boil orders that affect drains. For most homesteaders, that quiet independence is the whole reason for moving rural in the first place.
The Three Stages of On Site Wastewater Treatment
Every septic system handles wastewater in three stages. The names change by region, but the process is the same.
Stage one is anaerobic digestion in the tank. Wastewater enters the tank and slows down. Heavy solids sink to the bottom and form sludge. Fats, oils, and grease rise to the top and form scum. The middle layer is the clear effluent that will move on to the next stage. Anaerobic bacteria living in the sludge layer break down the solids over weeks and months. They reduce the volume by 60 percent or more, which is why a properly sized tank only needs pumping every three to five years.
Stage two is distribution. Effluent leaves the tank through an outlet baffle and flows by gravity to a distribution box. The distribution box, often called a D box, splits the flow evenly among the drain field trenches. Each trench gets its fair share so no single line gets overloaded.
Stage three is aerobic soil treatment. The drain field is a network of perforated pipes laid in gravel trenches or chambered tunnels under a few feet of soil. Effluent seeps out the holes, soaks into the soil, and travels slowly through the unsaturated zone above the water table. Aerobic bacteria living in that soil consume the remaining nitrogen, phosphorus, and pathogens. By the time the water reaches the groundwater, it is biologically clean.
Each stage matters. Skip the tank and the drain field clogs with solids in a year. Skip the D box and one trench takes all the flow and fails. Skip the soil layer and you are just dumping wastewater into the aquifer. The three stages together make septic work.
Anatomy of a Conventional Septic Tank
The tank is where the real work starts. Knowing its parts helps you spot trouble, plan maintenance, and have a useful conversation with the pumper.
The tank body is usually concrete, but polyethylene and fiberglass are common on smaller systems and in regions with hauling restrictions. Concrete is heaviest, longest lasting, and most resistant to floating up in high water tables. Poly is lighter and cheaper but can deform if pickup trucks drive over it. Fiberglass sits in the middle and resists corrosion well.
The inlet baffle is a tee or wall on the inlet side that forces incoming water down below the scum layer. Without it, fresh sewage would punch straight across the tank and out the outlet, undermining the separation work.
The outlet baffle is the same idea on the exit side. It pulls effluent from the middle clear layer, not from the floating scum or the bottom sludge. A modern outlet baffle holds an effluent filter, which is a removable screen that catches stray solids before they reach the drain field. Cleaning that filter twice a year is the single highest leverage maintenance task in the whole system.
The two compartment design doubles the separation work. Most modern tanks have a baffle wall in the middle that splits the tank into a larger first compartment and a smaller second compartment. Solids and scum settle in the first compartment. The second compartment polishes the effluent before it leaves. Older single compartment tanks still work but lose some efficiency.
Risers and lids bring the access ports up to grade. A buried tank with no riser means the homeowner cannot inspect, pump, or service it without digging. A pair of poly risers and lids at grade is one of the best upgrades a new homesteader can make. Expect to spend $200 to $500 in parts and a half day of labor.
Inspection ports are smaller pipes that come up over the inlet and outlet baffles. A homestead with grade level inspection ports can check the sludge depth, the effluent filter, and the baffle condition without ever opening the main lids.
How the Drain Field Works
The drain field, also called the leach field or soil treatment area, is where the actual cleaning happens. The tank just buffers and separates. The soil does the chemistry.
A drain field is a set of long shallow trenches dug 18 to 36 inches deep. Each trench holds a layer of gravel, a perforated pipe running along the center, and a few feet of native soil on top. The trenches sit at the same elevation so the distribution box feeds them evenly. Effluent enters the pipes, seeps out the perforations, soaks into the gravel, and slowly moves through the soil under and beside the trench.
The soil is doing three jobs at once. It physically filters out particles. It chemically binds phosphorus and metals. And it hosts a dense population of aerobic bacteria that consume nitrogen and pathogens. The result is water that is cleaner than most surface streams by the time it reaches the water table.
A drain field needs three feet of unsaturated soil between the bottom of the trench and the seasonal high water table. That gap is the active treatment zone. Less than three feet and the field starts dumping partially treated water straight into the aquifer. State code usually mandates the three foot separation, and the perc test is what confirms you have it.
A few common drain field styles show up on homesteads. Gravel trenches are the classic, cheap, and well understood. Chamber systems use plastic dome chambers instead of gravel, save trucking and digging, and work in tight sites. Drip dispersal uses pressurized small bore tubing to spread effluent across a much smaller area, good for steep or rocky sites. Mound systems build a raised sand mound above the original grade when the soil below is too tight or the water table is too high.
A leveled distribution box is non negotiable. If the D box tilts even a quarter inch, one trench gets all the flow and saturates. The other trenches do nothing while the loaded one fails. Most failed drain fields trace back to a tilted D box that nobody checked in 15 years.
Sizing Your Septic System
Sizing comes down to two numbers. How much wastewater your house makes per day. And how fast your soil can absorb it. Get those two right and the rest is plug and play.
Daily flow is driven by the number of bedrooms, not the number of bathrooms. State codes use bedrooms because that is the easiest proxy for occupancy. A typical guideline is 150 gallons per day per bedroom for design flow. A three bedroom homestead designs for 450 gallons per day, even if only two people live there year round. The extra capacity carries you through busy weekends and future occupancy.
Tank size scales with daily flow. The tank should hold at least 1.5 times the daily flow, so a 450 gallon per day house needs a 750 gallon tank at minimum. Most homesteaders go a step larger to stretch pump out intervals.
| Bedrooms | Design Flow | Minimum Tank Size | Recommended Tank Size |
|---|---|---|---|
| 2 | 300 gpd | 750 gallons | 1,000 gallons |
| 3 | 450 gpd | 900 gallons | 1,000 to 1,250 gallons |
| 4 | 600 gpd | 1,000 gallons | 1,250 to 1,500 gallons |
| 5 | 750 gpd | 1,250 gallons | 1,500 to 2,000 gallons |
| 6 | 900 gpd | 1,500 gallons | 2,000 gallons |
Drain field size scales with soil perc rate and daily flow. The perc rate is how fast water soaks into a test hole, measured in minutes per inch. A faster soil needs less area. A slower soil needs more.
| Perc Rate | Soil Type | Drain Field Area for 3 Bedroom Home |
|---|---|---|
| 1 to 5 min/inch | Coarse sand | 400 sq ft |
| 6 to 15 min/inch | Sandy loam | 600 to 900 sq ft |
| 16 to 30 min/inch | Loam | 900 to 1,200 sq ft |
| 31 to 60 min/inch | Clay loam | 1,200 to 1,800 sq ft |
| 61 to 120 min/inch | Heavy clay (mound or ATU needed) | n/a |
The real driver of both numbers is daily water use. A long shower habit, a family that runs three loads of laundry on Saturday, and a garden hose tied to a slop sink all push the design number up. Run your real numbers through a friendly calculator before you commit to a size.
Oversizing the tank costs a few hundred dollars and pays you back in longer pump intervals. Oversizing the drain field costs more in trenching and gravel but adds life and resilience. Underrating either one is the more expensive mistake.
Septic System Types Compared
Conventional gravity is the cheapest and simplest, but it is not the only option. The right system depends on soil, slope, water table, and budget.
| System Type | Typical Cost | Where It Fits | Pros | Cons |
|---|---|---|---|---|
| Conventional gravity | $5,000 to $15,000 | Sloping site, deep good soil, gravity from house | Cheap, simple, no power | Needs proper perc and elevation |
| Pressure dosed | $8,000 to $18,000 | Flat sites, marginal soil | Even distribution, longer life | Needs a pump and power |
| Mound system | $15,000 to $35,000 | High water table, tight clay, shallow bedrock | Works where conventional fails | Big footprint, expensive, visible |
| Sand filter | $12,000 to $25,000 | Tight soil, environmentally sensitive sites | Excellent treatment, smaller field | Needs a pump, more maintenance |
| Aerobic Treatment Unit (ATU) | $12,000 to $22,000 | Tight soil, small lots, sensitive watersheds | Compact, top quality effluent | Power required, annual service contract |
| Drip dispersal | $14,000 to $28,000 | Steep, rocky, or wooded sites | Distributes over wide area, low footprint | Filter and pump maintenance, freezing risk |
Conventional gravity is the default for most homesteaders. Mound and ATU are the answers when the soil fails the perc test. Drip dispersal shines on steep wooded sites where you want minimal disturbance. Choose the system after the perc test, not before.
The Perc Test and Site Evaluation
A perc test is the soil interview that decides which system you can install. The test is simple. A licensed evaluator digs several holes at the planned drain field location, saturates them with water, and measures how long it takes the water to drop one inch. The result, in minutes per inch, tells you how fast the soil absorbs water.
A great perc rate is 10 to 30 minutes per inch. Sandy loam soaks effluent quickly enough for a small drain field but slowly enough to give the bacteria time to clean it. A perc rate under 5 minutes per inch is too fast, the water blows through before treatment finishes, and a sand filter or mound becomes the answer. A rate over 60 minutes per inch is too slow, conventional gravity will not work, and a mound or ATU is the path forward.
The site evaluation also checks the seasonal high water table by digging a soil profile pit and looking for mottled gray layers. Those layers mark how high groundwater rises in spring. State code typically wants at least three feet between that line and the bottom of the trench. Less than that and a mound system raises the trenches above grade with imported sand.
A failed perc test is not the end. It just means a more expensive system or a different location on the property. Many homesteaders move the drain field 50 feet uphill and pass on the second try. Always evaluate more than one site before committing.
The perc test usually costs $250 to $750. Many counties want it before issuing a building permit, so schedule it early in the property planning timeline.
Permits, Codes, and Inspections
The county health department is the gatekeeper for septic on a homestead. They issue the permit, approve the design, inspect the install, and sign off the as built drawing. Every county runs slightly different rules, so the first call from a new owner should be to the local environmental health office.
Most counties require five things in order.
- A site evaluation and perc test by a licensed evaluator.
- A system design stamped by a licensed designer or engineer.
- A permit application with site plan and design drawings.
- An inspection during install, usually with the trenches open.
- An as built drawing filed with the county after backfill.
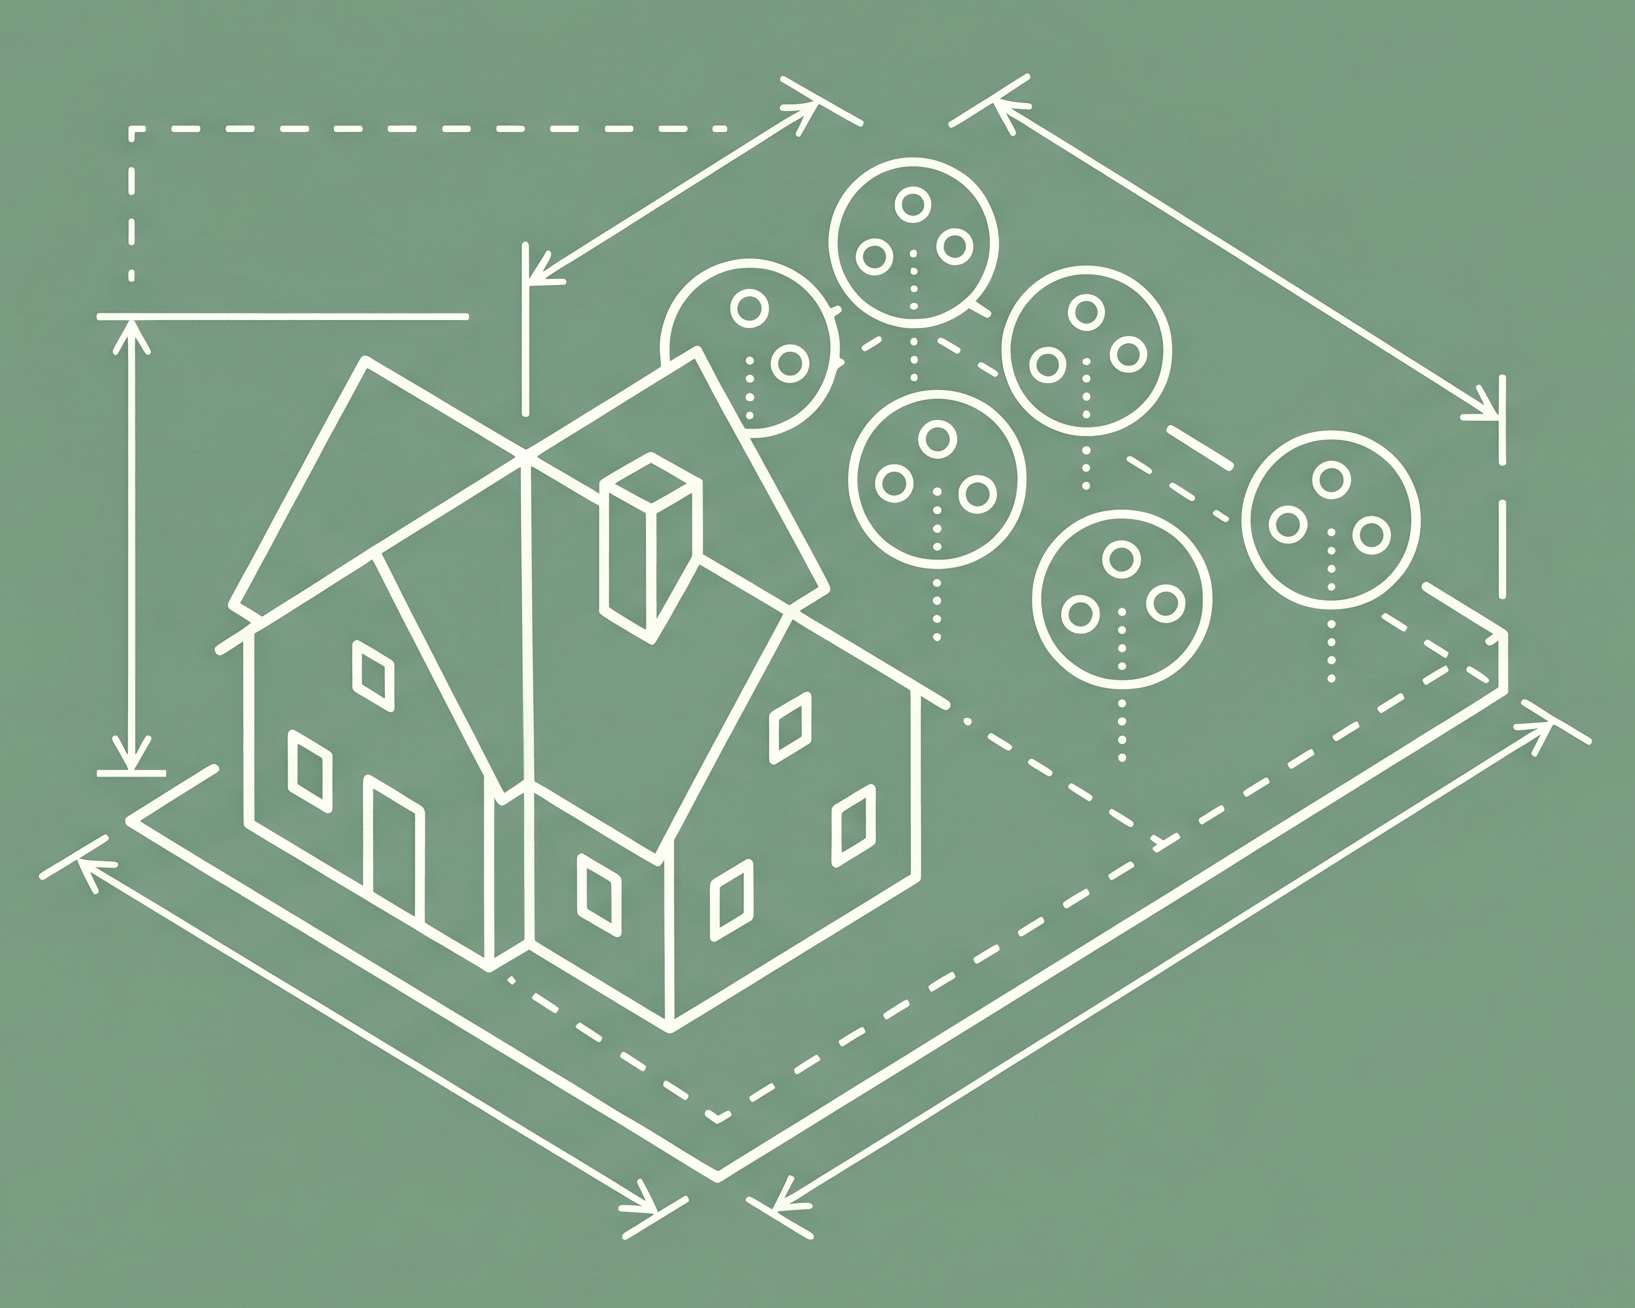
The as built drawing is gold. It shows the location of the tank, the D box, every drain field line, and the distance from buildings, wells, and property lines. Keep the original in a fireproof box and a copy on your phone. The first thing the next pumper or buyer will ask for is the as built.
Set back distances are strict in most states. Common minimums are 100 feet from a drinking water well, 50 feet from property lines, 25 feet from a building, 10 feet from a water line, and 50 feet from streams or wetlands. Your county may go further. Verify before excavation, not after.
The state by state homesteading rules vary on what is allowed without permits, who can self design, and whether owner installs are permitted. Walk through our state by state homesteading hub for the rules where you live.
Cost of a Homestead Septic System
Costs run a wide range depending on soil, slope, system type, and how much you do yourself. Here is a realistic breakdown of a conventional gravity install for a three bedroom homestead.
| Line Item | Realistic Spend |
|---|---|
| Site evaluation and perc test | $250 to $750 |
| Permit fees | $150 to $750 |
| System design | $500 to $2,500 |
| 1,000 gallon concrete tank | $1,000 to $1,800 |
| Tank delivery and setting | $500 to $1,200 |
| Risers, lids, and effluent filter | $200 to $500 |
| Distribution box | $50 to $150 |
| Drain field excavation | $1,500 to $4,000 |
| Gravel or chambers | $800 to $2,500 |
| Pipe and fittings | $200 to $500 |
| Backfill and final grading | $500 to $1,500 |
| Inspection fees | $100 to $400 |
| Final as built drawing | $200 to $500 |
A patient owner doing some of the labor themselves can land near $6,000 to $8,000. A turnkey install by a single contractor on a clean site usually lands $10,000 to $15,000. Hard sites with mound or ATU systems push $20,000 to $35,000.
Here is the tier table for full installs by system type.
| Tier | What You Get | Typical Total |
|---|---|---|
| Basic gravity | Conventional tank and drain field, simple slope | $5,000 to $10,000 |
| Standard gravity | 1,250 gallon tank, 4 trench drain field, risers | $10,000 to $15,000 |
| Pressure dosed | Standard plus pump tank and pressure manifold | $14,000 to $20,000 |
| Mound system | Imported sand mound for high water table | $18,000 to $30,000 |
| ATU system | Aerobic unit plus small drain field | $14,000 to $22,000 |
Annual operating cost is mostly the pump truck every three to five years. Expect $300 to $600 per pump out. ATU and pressure dosed systems add an annual service contract of $200 to $400. Even on the high end, septic stays a few hundred dollars per year over the long run.
A Realistic Maintenance Calendar
Most beginners do nothing until something backs up. By then the drain field is wrecked and the repair is five figures. A 30 minute habit twice a year keeps the system humming.
| Time of Year | Focus |
|---|---|
| January | Walk the drain field. Look for green stripes, soggy patches, or thawed snow lines. Note any change since last winter. |
| February | Check the as built location of the tank lids. Snow off the risers. Inspect for any settling around the lids. |
| March | Pull the effluent filter at the outlet baffle. Hose it off back into the tank inlet, not the drain field. Reset it. |
| April | Inspect the distribution box level. A four foot level on the D box outlet pipes tells you if it has shifted. |
| May | Schedule a pump out if it has been three or more years. Record the sludge depth before pumping. |
| June | Walk the drain field again as the ground dries. Look for soft spots or odor. |
| July | Add a vinegar and water flush through laundry lines if you use heavy detergent. Avoid bleach beyond normal use. |
| August | Confirm no vehicles are driving over the drain field. Mow but do not till the area. |
| September | Mark the drain field corners with pin flags or stakes ahead of winter. |
| October | Pull and clean the effluent filter again. Inspect baffles through inspection ports. |
| November | Inspect for any settling or exposed lids ahead of frost. Insulate any pumps or pressure manifolds. |
| December | Log the year. Pumping date, filter cleaning dates, any signs of stress. The log is gold for resale. |
The two highest leverage tasks are the spring D box level check and the twice yearly effluent filter cleaning. Together they prevent more failures than every other task combined.
Pumping cadence depends on tank size, household size, and daily use. A two person household with a 1,250 gallon tank can stretch to five years. A six person household with a 1,000 gallon tank should pump every two years. When in doubt, pull a sludge depth measurement annually with a five foot dowel wrapped in a white rag and pump when sludge fills more than a third of the tank depth.
What Kills a Septic System
Most drain field failures trace back to a few preventable habits. Avoid these and the system runs for 30 to 40 years.
Grease and oil down the drain. Bacon grease, fryer oil, butter, mayonnaise. They float to the scum layer, get pushed into the outlet baffle, and clog the effluent filter or the drain field pipes. Scrape pans into the trash.
Flushable wipes and feminine products. They do not break down. They form rope nests in the tank that hook on the baffles and overflow.
Heavy bleach and antibacterial cleaners. Normal use is fine. A full gallon of bleach dumped down the drain kills the bacteria population that runs the tank. The tank stops digesting and fills with solids fast.
Garbage disposals. A disposal triples the solids load on a septic system. If you have one, use it sparingly and step up your tank size and pumping frequency.
Driving or parking on the drain field. A pickup truck compacts the soil and crushes the chambers or pipes underneath. Treat the drain field like a flower bed, not a driveway.
Trees and deep rooted shrubs on the drain field. Tree roots will find the moisture and grow right into the pipes. Keep the drain field as a mowed grass meadow. No willows, no maples, no fruit trees within 30 feet.
Water softener brine into the septic. The salt slug shocks the bacteria and can swell some soils. Route softener brine to a separate dry well or surface discharge where allowed.
Long water spikes from leaking fixtures. A constantly running toilet drips 200 gallons a day through the tank, blowing solids straight into the drain field. Fix the flapper.
Most of these are habits, not hardware. Adjust the habits and the system lasts.
Signs Your Septic Is Failing
A septic system rarely fails in one dramatic moment. It warns you for weeks or months first. Catch it early and the fix is cheap. Wait and you are digging up the drain field.
- Slow drains in multiple fixtures at once, especially the lowest drain in the house.
- A gurgling sound from drains when the washing machine empties.
- Sewage smell in the yard, around the tank lid, or near the drain field.
- A vivid green grass stripe over a drain field line in dry weather.
- Soggy ground or standing water over the drain field, even when it has not rained.
- Sewage backup into the lowest drain or floor drain.
- Algae bloom in a downstream pond or ditch where effluent might be surfacing.
One sign is a warning. Two or more is an active failure. Three or more is a call to the pumper today and a call to the septic designer tomorrow.
DIY Versus Calling a Pro
Some septic work is well within reach of a confident homesteader. Other work needs licensed help.
You can absolutely do yourself. Pull and clean the effluent filter. Add risers and lids over an existing tank. Locate the lids with a tank locator or a length of stiff wire. Probe the distribution box. Keep the maintenance log. Mow the drain field.
You should hire a pro for. Initial system design and install in nearly every state requires a licensed installer. Tank pumping requires a licensed pumper with a tanker truck. Drain field replacement is heavy excavation under inspection. ATU service is usually contracted because the maintenance schedule and air pump replacement are specialized.
You can split the work. Many homesteaders dig their own trenches under contractor supervision, hire a pumper for the tank, set their own risers, and have the licensed designer sign off the final as built. Each county allows different levels of owner involvement. Ask early and put it in writing.
A pump truck visit every three to five years is the single best investment in the system. Skip it and you save $400 once. Pay it and the drain field lasts 30 years. The math is not subtle.
Cold Climate and Off Grid Power Considerations
Septic and winter get along better than most systems on a homestead, but a cold climate still rewards a little planning.
Freezing risk is highest in shallow trenches and uninsulated pipes. Code minimum cover is typically two feet over the trench and two feet over the tank. In northern climates, add six inches of foam board insulation over the tank lid and over any pipe section that runs less than three feet deep. A snow blanket actually helps. Bare frozen ground over a drain field is more dangerous than ground covered in snow.
A vacation freeze is a real risk for a part time cabin. With no warm wastewater flowing through, the tank cools and ice can form at the inlet baffle. Either heat the cabin enough to keep small flows going, or fully winterize by pumping the tank and draining the lines.
Pumps and electrical components in a pressure dosed or ATU system run on house power. An off grid solar setup needs to budget for that load. A typical septic pump runs 40 to 80 watts continuously when active. An ATU air pump runs 60 to 120 watts continuously. Both add a steady daily kWh load that needs to be in your solar sizing. The battery bank sizing guide walks through how to plan for those loads in winter.
Gravity systems sidestep the whole power conversation. If your site allows true gravity from house to tank to drain field, the septic system runs through any blackout indefinitely.
Backup power matters most for ATU systems. A 24 hour outage kills the bacterial population and takes weeks to recover. Many ATU owners run the air pump on a small inverter tied directly to the battery bank rather than the inverter that powers the house.
A well planned off grid septic system uses gravity wherever possible and reserves power only for the steps that truly need it.
Common Beginner Mistakes With Septic Systems
Almost every new homesteader walks into the same set of traps. The good news is you can skip nearly all of them.
- Buying land before checking the perc test. A perc test is cheap insurance. A bad perc result on a closed deal is a $20,000 surprise.
- Skipping the risers. A buried lid is a future excavation bill. Set risers during the install, not after the next failure.
- Forgetting the effluent filter. A clean filter doubles the drain field life. Most installers will leave one out unless you ask.
- Letting trees grow over the drain field. Roots will find the moisture. Keep the area mowed grass.
- Driving over the drain field. A single heavy load compacts the soil and shortens the field life by years.
- Ignoring the as built drawing. Without it, the next owner, the next pumper, and the next inspector are guessing. Scan it. Store it.
- Pouring bleach and harsh cleaners down the drain. Normal household use is fine. A gallon shock dose kills the tank bacteria.
- Using a garbage disposal without upsizing the tank. Disposals triple the solids load. Either skip them or step up the system.
- Stretching pump intervals past five years to save money. A neglected tank dumps solids into the drain field. Replacement runs $10,000 to $20,000.
- Mixing softener brine and septic. Salt slugs the bacteria. Route brine elsewhere.
Avoid those ten and your septic system will outlive the original mortgage.
Build Skills Alongside the Hardware
Hardware decays. Skills compound. The best septic systems belong to homesteaders who understand them.
Locate every lid. A tank locator wand or a length of steel wire finds the lids in 20 minutes. Once you know where they are, mark them with a pin flag and a string line. Future you will be grateful.
Read the as built. Spend an hour with the drawing and a measuring tape. Walk the lines. Find the corners of the drain field. The drawing becomes a map of the yard.
Learn the sludge dowel trick. A five foot length of dowel wrapped in a white rag, lowered slowly to the bottom of the tank, brings up a dark line at the sludge layer. A clear sludge depth measurement tells you when to pump.
Keep a maintenance log. Pump date, sludge depth, filter cleaning dates, any signs of stress. A few lines a year for 20 years is a record that adds real value at resale.
Practice riser maintenance. Pull a riser lid. Inspect the gasket. Clean the rim. Reset the lid. Two minutes done well prevents an inch of inflow during a heavy rain.
Run the perc math. If you ever expand the house, add a bedroom, or build a guest cabin, you will want to know how much more drain field you need. The bedroom count and perc rate numbers earlier in this guide get you most of the way.
A working septic system is a small set of skills. Each one you add makes the next one easier.
You Can Start This Week
The biggest trap new homesteaders fall into is feeling stuck because they cannot see what is buried. The truth is you can take the first step without ever picking up a shovel.
Pick one thing this week. Call the county health department and ask for a copy of the most recent as built drawing on file for your property. Or pull on boots and walk the yard with a notebook, marking suspected lid locations, low spots, and any unusual grass color. The first day you can point at the tank and the drain field with confidence, the rest of the system stops feeling like a mystery.
When you are ready for more, our off grid hub gathers every water, power, waste, and heating guide we have. Pair this article with our composting toilets guide if you are weighing waste options together, or our water filtration guide and our well drilling guide for the supply side of the same plumbing.
For the broader off grid picture, lean on our off grid living for beginners pillar. For the wider homesteading roadmap, our homesteading for beginners pillar lays out the full sequence. For the legal details in your state, our state by state homesteading hub covers permits, set backs, and water rights across all 50 states.
You can do this. We are glad you are here.
Frequently Asked Questions
Most homesteads pump every three to five years. A two person household with a 1,250 gallon tank can stretch to five years. A six person household with a 1,000 gallon tank should pump every two years. The real test is sludge depth. When sludge fills more than a third of the tank depth, schedule the pumper. Always log the pump date so you can predict the next one.
A well maintained gravity septic system lasts 25 to 40 years. The tank usually outlives the drain field. Concrete tanks routinely run 40 to 50 years. Drain fields run 20 to 30 years if the household avoids grease, harsh chemicals, vehicle traffic, and tree roots. ATU and pump systems last 15 to 25 years with annual service. Replacement is the drain field, not the tank, in nearly every case.
A conventional gravity system for a three bedroom homestead runs $5,000 to $15,000 installed. Pressure dosed systems run $14,000 to $20,000. Mound systems for high water tables or tight clay run $18,000 to $35,000. ATU systems run $14,000 to $22,000. Annual operating cost is mostly the pump truck every three to five years at $300 to $600 per visit.
Most states require a licensed installer for the actual install and a county inspection of the open trenches. Many states allow the owner to do part of the work under contractor supervision, including hand digging, riser install, and final backfill. The system design and final as built must be signed by a licensed professional. Always call the county health department before lifting a shovel.
Yes, if you use a conventional gravity system. House to tank to distribution box to drain field can all run on gravity alone. No pump, no electricity, no moving parts. Pressure dosed, ATU, drip dispersal, and mound systems all need a small pump that draws 40 to 120 watts continuously. On an off grid solar system, account for that load year round and consider a battery backup for the pump circuit.
A septic tank is a sealed two stage treatment vessel that separates solids and discharges clear effluent to a drain field for soil treatment. A cesspool is an open bottom pit that drops raw wastewater straight into the ground with no separation or treatment. Cesspools are illegal in most states for new construction. Existing cesspools are usually grandfathered until they fail, then must be replaced with a proper septic system.
Almost never. A healthy septic tank already hosts billions of bacteria. Adding more does nothing useful. Yeast and enzyme products waste money. Worse, some chemical additives like quicklime, drain openers, and degreasers harm the bacteria population and damage the drain field. The single best septic additive is a regular pump out every three to five years and a clean effluent filter.
Stop pushing water through it first. Cut back laundry and showers. Schedule a pump out to relieve the tank. Call a licensed septic professional to inspect the distribution box and trenches. Many partial failures recover with a year of rest and lighter loading. A fully failed field needs replacement, which runs $5,000 to $15,000 for a conventional rebuild or more for a mound or ATU. The county may require a fresh perc test and design.

Cole
Founder & Lead Researcher
Cole is the founder of Plan Your Homestead. He works in clinical research and brings a research-first lens to every guide on the site, drawing on a long family line of farmers for grounded, practical perspective.
More in Off-Grid
More articles coming soon. Check back for new off-grid content.