So you have water coming into the house. Maybe it is well water with a mineral aftertaste. Maybe it is rain off a metal roof. Maybe a spring on the hillside fills a tank above the cabin. Or maybe a creek is the only source you have. Whatever the path, the question is the same. Is that water safe to drink today, and will it still be safe in August when the cows step in the spring or a frog sneaks past the screen.
Homestead water filtration is the answer. It is also one of the most confusing parts of off grid living for beginners. Every brand promises pure water. Every blog post lists a different stack. Micron ratings, NSF certifications, absolute versus nominal, UV dosing, reverse osmosis recovery rates. It reads like a chemistry exam, and the stakes are real. A bad filter choice can leave bacteria, lead, or pesticides in the water you are pouring for your kids.
The good news is that homestead water filtration is not actually complicated once you see the structure. Every safe drinking water system in the world is built from the same four steps in roughly the same order. By the end of this guide you will know what each stage does, how to match a stack to your specific water source, what a real system costs, how often to test, and the mistakes that drain beginner wallets. Grab a glass of water. Let us walk through it together.
What Homestead Water Filtration Actually Is
Water filtration is the process of removing or killing the things in raw water that can make you sick or wreck your plumbing. Sediment. Iron. Bacteria. Viruses. Parasites. Chlorine. Lead. Pesticides. Hard mineral scale. Each one needs a different tool, and a real homestead system stacks those tools in the right order so each stage handles what it is built for.
Filtration is not purification. Purification removes almost everything, including beneficial minerals, and is what a reverse osmosis or distillation system does. Filtration removes the things you do not want and leaves the rest. Most homesteads want filtration with one purification step on a dedicated drinking faucet, not whole house purification. That choice keeps the water in your shower and your washing machine soft and pleasant while still hitting potable standards at the kitchen tap.
People have been filtering water for a long time. Roman lead pipes ran through gravel beds for a reason. Medieval villages built sand filter ponds. Civil War soldiers carried small ceramic filters in their packs. The technology has improved, but the layered approach has not. A modern stack just trades clay pots for cartridges and adds a UV lamp at the end.
A modern homestead system can be as small as a countertop gravity filter that sits next to your coffee maker. It can also be as ambitious as a whole house pressure stack feeding every fixture in the cabin with a separate under sink polish for the drinking glass. The right scope depends on your water source, your budget, and how many fixtures need treated water.
Why Filtering Your Homestead Water Matters
Untreated water can hurt you. Coliform bacteria from animal waste cause cramps and diarrhea within hours. E. coli can put a kid in the hospital. Cryptosporidium and giardia are tough cysts that pass right through cheap filters and cause weeks of misery. Heavy metals like lead and arsenic build up over years and cause damage you only notice once it is permanent.
There is also the everyday quality of life. Hard well water leaves scale on every fixture and shortens the life of water heaters. Iron stains laundry. Sulfur smells like rotten eggs in the shower. Chlorine in city water dries out skin. A good filter stack is not just about safety. It is about clean glasses, soft laundry, and water that actually tastes like water.
Filtration also protects the rest of your homestead. A whole house sediment filter saves your washing machine, your dishwasher, your tankless water heater, and every faucet aerator from grit that would otherwise grind them down. The filter pays for itself in appliance life within a few years. That is before you count avoided plumber visits.
And then there is the independence. A city water supply can issue a boil order in the middle of a storm. A well pump can pull in surface contamination after heavy rain. A spring can flood after spring thaw. A well built homestead filter stack handles all three. You stop worrying about boil notices and start trusting your own tap.
Know Your Water Source Before You Buy a Filter
The single biggest mistake beginners make is buying a filter before they understand the water it has to clean. Every source carries different threats. Buy the filter for the water you actually have, not the water you imagine.
Well Water
Well water sits underground for months or years before it reaches your tap. That long contact with soil and rock removes most pathogens but loads the water with dissolved minerals. Expect iron, manganese, calcium, magnesium, and sometimes sulfur or radon. Shallow wells can also carry surface bacteria after heavy rain. Modern well drilling guides go deeper for a reason. If you want the full picture on well design and cost, see our complete well drilling guide.
Typical well water issues include hardness, iron staining, sulfur smell, occasional bacteria after rain, and in some regions arsenic, nitrates, or radon. The treatment usually starts with a sediment filter, adds a water softener or iron removal stage if needed, finishes with carbon for taste, and sometimes adds UV for shallow wells.
Spring Water
Spring water is groundwater that finds the surface on its own. Done right with a sealed spring box and a screened overflow, spring water is some of the cleanest water on the planet. Done sloppily with an open hole and a bucket, it is a bacterial hazard. The full spring development guide walks through the build.
Typical spring water issues are low pressure, mild sediment, the occasional bacteria event after heavy rain, and whatever minerals the local rock contributes. A good spring system uses a 20 micron sediment cartridge, a carbon block for taste, and UV disinfection as a final barrier.
Rainwater
Rainwater is the softest water that falls on your property. It carries no chlorine, no fluoride, and no hard mineral load. It can carry roof dust, pollen, bird droppings, and trace heavy metals from old flashing or paint. The full rainwater harvesting guide covers catchment design end to end.
Typical rainwater issues are organic dust from the roof, pathogens from bird droppings, and lead from pre 1980 paint. The treatment ladder is a first flush diverter at the tank, a sediment filter, a carbon block, a one micron absolute filter, and UV disinfection. Rainwater is also the source where lab testing matters most.
Surface Water
Surface water means a creek, pond, river, or lake. It is the source with the most threats and the most variable load. Expect heavy sediment, bacteria, parasites, agricultural runoff, and seasonal algae. Treat it as worst case until tested.
A surface water stack starts with a settling tank, adds a coarse sediment screen, follows with a 5 micron sediment cartridge, then a one micron absolute filter for cysts, then carbon block for taste, and finishes with UV. Many homesteaders also add a small chlorine injection in front of the carbon for an extra safety margin.
Warning
Never assume your water is safe because it looks clean and the neighbors drink it. Clear water can carry invisible pathogens, heavy metals, and dissolved chemicals. A state certified lab test is the only way to know what your water actually contains. Test before you buy a filter, then again every year.
The Four Common Threats in Untreated Water
Almost every contaminant you care about falls into one of four buckets. Learn the buckets and the filter stack starts to make sense.
Sediment. Sand, silt, rust flakes, leaf bits, and other solids. They are the easy ones. A mesh screen and a sediment cartridge catch them.
Organics and taste compounds. Chlorine, pesticides, herbicides, fertilizer runoff, decomposing plant matter, and the volatile organic compounds that make water taste odd. Activated carbon adsorbs them. A good carbon block also pulls in heavy metals like lead.
Pathogens. Bacteria, viruses, and parasitic cysts. Bacteria and viruses are tiny and need either a one micron absolute filter, UV light, or chemical disinfection. Cysts like giardia and cryptosporidium are bigger and a one micron absolute filter alone catches them.
Dissolved chemicals and minerals. Sodium, calcium, magnesium, arsenic, nitrates, fluoride, and a long list of dissolved ions. Standard filters do not remove these. Reverse osmosis, distillation, or specialty media handle them.
A four stage stack handles the first three buckets cleanly. A fifth stage adds dissolved chemical removal where needed. That is the whole structure.
Understanding Micron Ratings
A micron is one millionth of a meter. A human hair is about 70 microns. A grain of sand is roughly 100 microns. Most bacteria are around 1 to 5 microns. Cysts like giardia are 8 to 14 microns. Viruses are smaller, around 0.01 to 0.1 microns, and need UV or chemical disinfection to handle.
Filter cartridges list a micron rating that tells you the size of particle they catch. A 50 micron filter catches sand. A 5 micron filter catches fine silt and some bacteria clusters. A 1 micron filter catches giardia and cryptosporidium cysts.
Tip
Watch for the difference between "nominal" and "absolute" ratings. A nominal 1 micron filter catches most particles at that size but lets some through. An absolute 1 micron filter catches 99.9 percent of them. Always buy "absolute" rated cartridges when pathogens are on the line. The label matters more than the number.
A common beginner mistake is using a single very fine filter at the start of the stack. A 1 micron cartridge plugged with mud clogs in a day. Run the stages from coarse to fine. The 50 or 20 micron stage protects the 5 micron stage, which protects the 1 micron stage, which protects the UV lamp. Each stage handles what it is built for and lasts longer.
The Four Stage Filter Ladder Every Homestead Should Know
This is the spine of every safe drinking water system. Memorize the order and you can design a stack for any source.
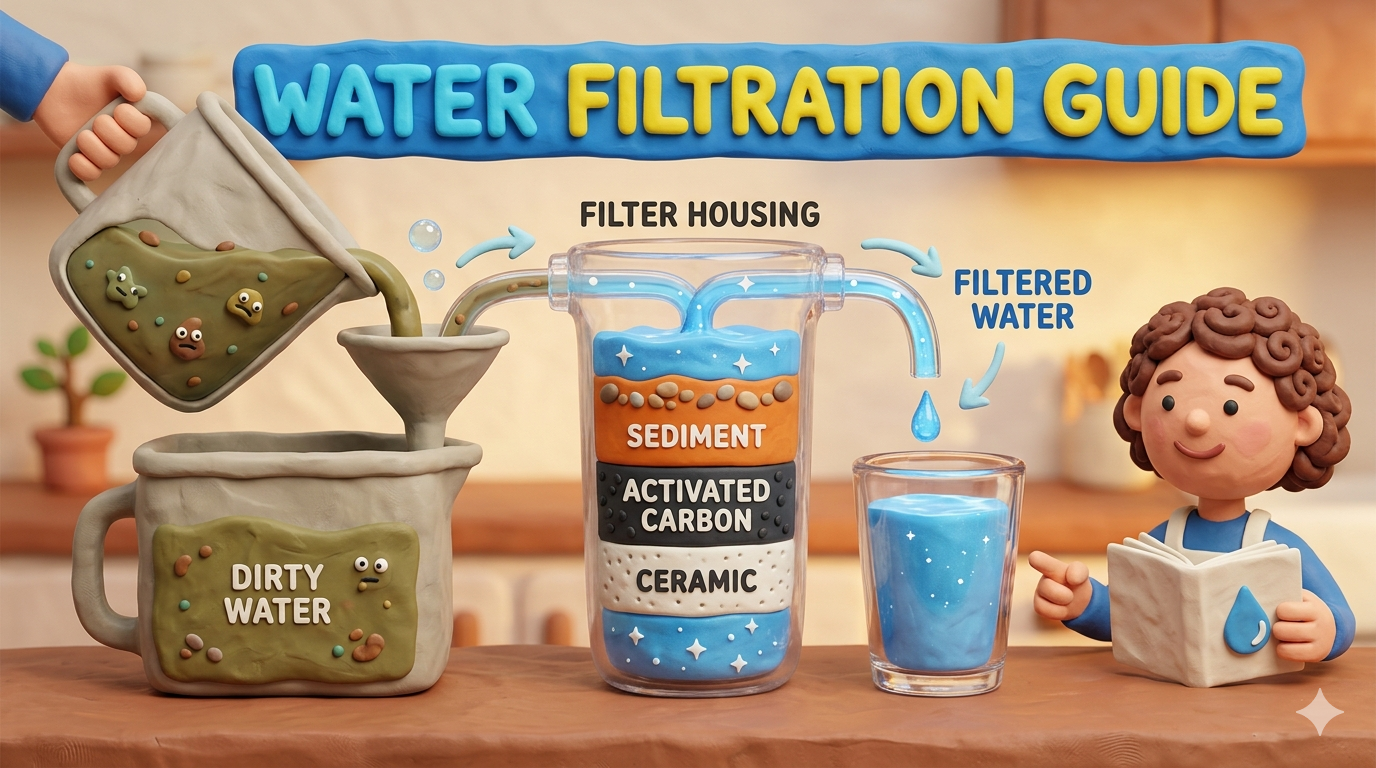
Stage 1: Sediment. A 20 to 50 micron pleated cartridge catches sand, silt, and rust. Cheap, easy to swap, always first. Replace every 3 to 6 months depending on water clarity.
Stage 2: Carbon block. A 5 micron activated carbon cartridge adsorbs chlorine, organic compounds, pesticides, and most taste and odor. A good carbon block also captures lead. Replace every 6 to 12 months.
Stage 3: One micron absolute filter. This is the cyst barrier. Catches giardia, cryptosporidium, and most bacteria clumps. Always buy "absolute" rated, never nominal. Replace every 6 to 12 months.
Stage 4: UV disinfection. A UV lamp kills bacteria and viruses as the water passes through a quartz sleeve. It is the only practical way to handle viruses on a homestead. The lamp needs replacement every 9,000 hours, which is roughly once a year for a household running 24/7.
Optional Stage 5: Reverse osmosis or distillation. This stage removes dissolved minerals, salts, fluoride, arsenic, and nitrates. Most homesteads run this on a single drinking faucet rather than the whole house, because it strips beneficial minerals and slows the flow.
Order matters. UV at the end. The one micron absolute filter just before UV, because UV needs clear water to work. Carbon before the one micron stage so chlorine does not foul the absolute cartridge. Sediment first so the rest of the stack lasts.
Comparing the Main Filter Types
There are many shapes a homestead filter can take. Here is a side by side look at the most common.
| Filter Type | Typical Cost | Flow Rate | Pathogen Rating | Best Fit |
|---|---|---|---|---|
| Pitcher filter | $30 to $80 | Slow | Low | Renters, apartments, light city water polish |
| Countertop gravity | $200 to $400 | Slow batch | Good with right cartridges | Off grid cabins, emergency backup, single faucet |
| Whole house cartridge | $250 to $1,200 | High | Moderate alone, good with UV | Wells, springs, light surface water |
| Under sink RO | $200 to $700 | Slow | High (very fine membrane) | Drinking faucet polish, dissolved chemical removal |
| UV disinfection | $300 to $900 | High | Excellent for bacteria and viruses | Final barrier on any source, mandatory for rainwater and surface |
| Distiller | $150 to $400 | Very slow | Excellent | Single drinking faucet, lab grade purity |
| Sediment screen (point of entry) | $40 to $150 | Very high | None | Pre stage protecting everything else |
A few honest notes. Pitcher filters are weak for homestead use. They are sized for city water that has already been treated. Countertop gravity systems with properly rated cartridges punch far above their weight and are the simplest off grid option. Whole house cartridge stacks are the right answer for most wells and springs once paired with UV. Under sink RO is a polish step, not a primary filter. UV is the most underused tool on homesteads. Distillers are slow but bulletproof and require no power beyond a wall outlet.
Matching the Filter to the Water Source
Here is the practical mapping. Find your source. Read across the row.
| Water Source | Recommended Stack | Where to Place |
|---|---|---|
| Deep drilled well, mild minerals | 20 micron sediment, 5 micron carbon block, optional softener | Whole house point of entry |
| Shallow well, occasional bacteria | 20 micron sediment, 5 micron carbon block, UV disinfection | Whole house point of entry |
| Spring, sealed and screened | 20 micron sediment, 5 micron carbon block, UV disinfection | Point of entry, gravity fed |
| Rainwater for irrigation only | 50 micron screen, first flush diverter | Tank inlet |
| Rainwater for indoor potable | 20 micron sediment, 5 micron carbon block, 1 micron absolute, UV | Pressurized line before kitchen |
| Surface water (creek, pond) | Settling tank, 5 micron sediment, 1 micron absolute, carbon block, UV | Pressurized line, full ladder |
| City water with strong chlorine | 5 micron carbon block, optional RO at kitchen | Under sink polish |
A few patterns jump out. UV shows up on every source where bacteria are a real risk. The 1 micron absolute filter shows up wherever pathogens are likely. Carbon shows up everywhere because every source benefits from taste improvement. Reverse osmosis shows up only when you are chasing dissolved chemicals. Build the stack from those patterns and you will rarely overbuy.
Sizing a Whole House System
Sizing a whole house filter is mostly about flow rate, not pressure. The system has to keep up with peak household demand without dropping the kitchen faucet to a trickle. A family of four typically uses 8 to 12 gallons per minute during peak times. A shower runs about 2.5 gpm. A dishwasher pulls about 2 gpm. Two fixtures at once need 5 gpm minimum.
Pick cartridges and a UV system rated for at least 10 gpm if you want comfortable showers. Cartridges with a "big blue" housing handle higher flow than slim line housings. UV systems list a rated flow at a given dose, usually expressed as 40 mJ/cm squared. The dose matters because it determines kill efficiency. Buy the UV system that delivers 40 mJ at your peak flow, not at marketing rates.
The other sizing input is daily volume. A typical family of four uses 200 to 400 gallons per day depending on garden irrigation and animal water. Run your numbers through a friendly calculator before you buy a system.
The third input is contaminant load. A sediment cartridge in muddy water lasts a week. The same cartridge in clean spring water lasts six months. Plan to swap cartridges more often during wet seasons or after heavy rain events.
Pressure matters at the edges. A well pressure tank usually runs 40 to 60 psi. A gravity fed spring at 60 feet of head runs about 26 psi. Most cartridges drop 2 to 5 psi when clean and 10 to 20 psi when dirty. A gravity fed system at low head needs oversized housings to avoid losing all its pressure to the filters. Use 10 inch big blue housings for gravity, slim line is fine for pressurized.
UV Disinfection Without the Hand Waving
UV disinfection is the most misunderstood part of homestead filtration. The myth is that UV is fragile, expensive, and complicated. The reality is that a residential UV system is about as complex as a toaster and lasts decades with a yearly lamp swap.
A UV unit is a stainless steel chamber with a UV lamp inside a quartz sleeve. Water flows past the lamp and the UV light damages the DNA of any bacteria, virus, or parasite riding along. The cells cannot reproduce, so they cannot make you sick. The water comes out chemically identical, just biologically inert.
The right dose for residential drinking water is 40 mJ per square centimeter at peak flow. The lamp delivers a fixed UV output, so a higher flow rate gets a lower dose. Buy a system rated for 40 mJ at the highest flow you will ever push through it, not the average.
UV needs clean water to work. Cloudy water shields pathogens from the light. That is why UV is always the final stage, after the one micron absolute filter. Cartridges first. UV last.
Maintenance is simple. Wipe the quartz sleeve clean once a year when you swap the lamp. Inspect the gaskets for cracks. Replace the lamp on schedule, usually every 9,000 hours, even if it still glows. Lamps lose output over time and a dim lamp delivers a lower dose without changing the way it looks.
Power matters off grid. A residential UV lamp draws 30 to 60 watts continuously. That is roughly 1 kWh per day, or about 365 kWh per year. Plan for that load in your solar sizing. If you are building a solar system from scratch, our beginner solar power guide walks through the math.
Reverse Osmosis vs Distillation
These two are the heavy hitters for dissolved chemicals. Both produce very pure water. They get there differently.
Reverse osmosis pushes water through a semi permeable membrane at pressure. The membrane lets water molecules through and blocks almost everything else, including dissolved salts, fluoride, arsenic, nitrates, and heavy metals. A typical home RO system has four to five stages: a sediment prefilter, a carbon prefilter, the RO membrane, a storage tank, and a polishing carbon filter at the faucet.
RO has tradeoffs. It wastes water. A standard residential unit produces 1 gallon of pure water for every 3 to 5 gallons it processes. The rest goes down the drain. It also strips beneficial minerals, which is why RO water tastes flat to many people. And it runs slowly, usually 50 to 100 gallons per day. Most homesteads run RO on a single under sink faucet, not the whole house.
Distillation boils water, captures the steam, and condenses it back into a clean glass jar. Anything that is not water gets left behind in the boiling chamber. Distilled water is nearly chemically pure. The tradeoffs are speed and power. A countertop distiller makes about 1 gallon every 4 to 6 hours and uses around 800 watts while running. Off grid homes that want distilled water usually run the still during peak solar hours.
For most homesteads with clean source water, neither is required. RO and distillation are the answer for arsenic, fluoride, nitrates, or unusual dissolved chemistry confirmed by a lab test. They are the wrong answer for general filtration. Buy them when the lab tells you to.
Water Testing: The Step Almost Everyone Skips
A filter without a water test is a guess. You cannot pick the right cartridges, the right UV size, or the right specialty stage until you know what is actually in the water.
The basic potability panel covers coliform bacteria, E. coli, nitrates, nitrites, pH, hardness, iron, manganese, and lead. It costs 25 to 75 dollars at a state certified lab. Many county health departments offer it free or at cost. Pull a sample in a sterilized bottle the lab provides, ship it the same day, and you have results within a week.
The expanded panel adds arsenic, radon, volatile organic compounds, pesticides, and heavy metals. It costs 150 to 400 dollars and is worth doing once when you first move in. After that, run a basic panel every spring and after any major event like flooding, new pump installation, or a long dry stretch broken by heavy rain.
Test the raw source water and the treated water separately. The raw test tells you what your stack has to handle. The treated test tells you whether the stack is doing the job. If the treated water still shows coliform after a UV system, something is leaking past the lamp or the lab missed a step. Track both numbers over time.
Home test kits have a place. A 20 dollar kit covers pH, hardness, chlorine, and bacteria with a single dip. Use them for weekly confidence checks between annual lab visits. They are not a substitute for a real lab test when potability is on the line.
State by state rules and recommended panels vary. Walk through our state by state homesteading hub for the rules where you live.
What a Real Homestead Filtration System Costs
Costs scale with how much water you want treated and which threats are on the list. Here is a friendly snapshot.
| Tier | What You Get | Typical Spend |
|---|---|---|
| Countertop gravity | Single point gravity filter, candle style cartridges | $200 to $500 |
| Basic well stack | Whole house sediment plus carbon block, no UV | $300 to $800 |
| Standard whole house with UV | Sediment, carbon, 1 micron absolute, UV lamp | $1,000 to $2,500 |
| Rainwater potable system | Above plus first flush, calmed inlet, UV, plumbing inspection | $2,000 to $4,500 |
| Whole house plus under sink RO | Standard stack plus dedicated RO at kitchen | $1,500 to $3,500 |
| Premium with softener and iron removal | Above plus dedicated iron and softener stage | $3,500 to $7,500 |
Here is a closer look at where the money goes on a standard whole house build with UV.
| Category | Realistic Spend |
|---|---|
| Three stage big blue housings | $150 to $400 |
| Cartridges (sediment, carbon, 1 micron absolute) | $50 to $150 |
| UV system (10 gpm, 40 mJ rated) | $400 to $900 |
| Plumbing fittings and shutoffs | $80 to $200 |
| Pressure gauges on each stage | $40 to $100 |
| Optional bypass loop | $30 to $80 |
| Labor if you hire it out | $500 to $1,500 |
A patient DIY buyer can hit the low end of every line. Big box housings on sale, generic cartridges, and a weekend of work get a clean system for under 1,000 dollars. The same build with a plumber and premium parts pushes 3,000 dollars.
Annual operating cost is the part beginners forget. Sediment cartridges run 8 to 20 dollars every 3 to 6 months. Carbon and one micron absolute cartridges run 20 to 60 dollars each every 6 to 12 months. UV lamps run 60 to 150 dollars every year. Plan on 200 to 400 dollars a year in consumables for a standard whole house system.
Cold Climate and Off Grid Power Considerations
Filtration and freezing weather are old enemies. A frozen cartridge housing can split. A frozen quartz sleeve in a UV system can crack the lamp. A frozen RO membrane is dead. Cold climates take some planning, but every problem has a friendly answer.
Keep the filter stack indoors in a conditioned space. A utility closet, a basement, or a heated mechanical room is ideal. Insulate any pipes that run through unheated crawl spaces. A 100 watt pipe heat tape on a thermostat is cheap insurance for the worst weeks.
If the filter stack has to live outside, build a small insulated enclosure. A 4 foot by 4 foot box with foam insulation and a 60 watt heat lamp on a thermostat keeps the whole stack above freezing in most of the country. Add a small drain valve at the lowest point so you can dump the system if the power fails.
Off grid power has its own constraints. UV systems run continuously, which adds a steady 30 to 60 watt load to your daily energy budget. Solar systems with limited battery capacity should account for that load year round. A pressure pump for a well runs intermittently but pulls 800 to 1,500 watts when it kicks on, so a well plus UV plus a pressure pump can stack into a meaningful load.
Battery sizing on an off grid filter stack matters most in winter. UV cannot blink. If the lamp turns off, untreated water reaches the tap. Wire the UV onto a circuit with a dedicated battery cutoff that holds the filter chain on when other loads are shed. The battery bank sizing guide walks through the math.
A no power backup is worth planning. A countertop gravity filter sitting on the counter is your safety net for the day a winter storm takes the power and the UV down at the same time. Keep clean cartridges on hand and trust the gravity filter while you sort the bigger system out.
A Realistic First Year Maintenance Calendar
Most beginners feel lost because they do not know what to tackle when. Here is a friendly first year arc. Your timing will shift with your climate and your source, but the rhythm holds.
| Month | Focus |
|---|---|
| January | Pull a fresh raw water sample. Ship to lab for basic panel. |
| February | Review lab results. Adjust cartridge stack if needed. Order spare cartridges. |
| March | Swap winter cartridges that handled high turbidity. Inspect housings for cracks. |
| April | UV lamp check at the 6 month mark. Wipe quartz sleeve. Verify amber alarm not blinking. |
| May | Spring runoff means more sediment. Watch pressure gauges. Swap sediment if pressure drops. |
| June | Swap carbon block at the 12 month mark. Pull a follow up potability test. |
| July | Run home test kit weekly. Track chlorine, hardness, pH, and bacteria for confidence. |
| August | Swap 1 micron absolute cartridge. Confirm UV intensity. |
| September | Schedule annual UV lamp replacement. Order before October. |
| October | Replace UV lamp. Inspect O rings. Inspect sleeve for scale or scratches. |
| November | Drain any outdoor exposed lines. Insulate housings if they live in an unheated space. |
| December | Annual full system inspection. Verify pressure gauges. Pull a winter sample for trend tracking. |
For the wider companion calendar that covers solar, water, waste, and heat together, pair this guide with our off grid living for beginners pillar.
Common Beginner Mistakes With Water Filtration
Almost every new homesteader makes a version of the same handful of mistakes. The good news is that you can skip most of them by reading this section twice.
- Buying the filter before testing the water. A lab test tells you which cartridges you actually need. Without it, you are guessing.
- Skipping the sediment prefilter. A fine cartridge plugs in days when the water has any silt. Stage the filters from coarse to fine.
- Treating nominal as absolute. Nominal ratings let some particles through. Absolute ratings catch 99.9 percent. Always buy absolute for pathogen barriers.
- Forgetting the UV lamp swap. A dim lamp delivers a lower dose without looking different. Replace yearly even if it still glows.
- Putting UV before the absolute cartridge. Cloudy water shields pathogens from UV. UV is always last in the stack.
- Running whole house RO. RO is a polish step, not a primary filter. Use it on a single drinking faucet, not the entire house.
- Ignoring the pressure gauges. Gauges on each stage tell you when a cartridge is plugged. Watch them weekly.
- Letting the filter housings freeze. A cracked housing in February is a long, cold afternoon you will not enjoy. Keep the stack warm.
- Skipping the annual lab retest. Source water changes. Aquifers shift. New activity upslope can introduce new contaminants. Test every spring.
Avoid those nine and your first year will go better than most.
Build Skills Alongside the Hardware
Hardware decays. Skills compound. The best filter systems belong to homesteaders who can fix what they have.
Basic plumbing. Learn to cut, glue, and thread PVC. Learn how a pressure tank, a pressure switch, and a pump work together. A weekend with PVC and a few unions teaches you more than any video.
Cartridge swaps. Practice swapping cartridges with the system pressurized off. Drain the housing, turn the cartridge, seat the new one, check the O rings, restore pressure. Time yourself. A clean swap takes 5 minutes once you have done it twice.
UV maintenance. Practice pulling the lamp and sleeve without breaking anything. Both are fragile. The first lamp replacement is nerve wracking. The twentieth is routine.
Water testing. Buy a home test kit for chlorine, pH, hardness, and bacteria. Pair it with a yearly lab visit. The home kit gives you weekly confidence. The lab gives you the truth.
Pressure tank tuning. Learn the pressure switch range and how to set bladder air pressure. A correctly tuned pressure tank makes the whole house run smoother and protects every appliance downstream.
Filter sizing on the fly. Learn the flow rate of every cartridge in the house. When a new appliance shows up, you can check whether the current stack still has the flow to support it.
A working filter system is a stack of small skills. Each one you add makes the next one easier.
You Can Start This Week
The biggest trap new homesteaders fall into is trying to design the perfect filter stack before they begin. Perfection is the enemy of progress on a homestead. A simple countertop gravity filter sitting next to the coffee maker is worth more than a fully designed whole house plan that never gets installed.
Pick one thing this week. Order a basic potability test kit from your county health department. Or grab a countertop gravity filter and run it on the kitchen faucet starting tonight. The first day you pour a glass of water you actually trust, the rest of the build stops feeling so abstract.
When you are ready for more, our off grid hub gathers every water, power, and heating guide we have. Pair this article with our off grid living for beginners pillar for the bigger picture across power, waste, and heat. If your source is still in the planning phase, lean on our rainwater harvesting guide, our well drilling guide, or our spring development guide.
For the broader homesteading roadmap, lean on our homesteading for beginners pillar. For the legal details in your state, our state by state homesteading hub covers water rights, permits, and zoning across all 50 states.
You can do this. We are glad you are here.
Frequently Asked Questions
A three stage whole house cartridge system paired with UV disinfection covers most homestead wells. Use a 20 micron sediment prefilter, a 5 micron carbon block, and a UV lamp rated for 40 mJ at peak flow. Add a softener or iron stage if a lab test shows hardness or iron above 3 ppm. Always test the raw water first so the stack matches your specific well.
Most deep drilled wells do not need UV because the long underground travel filters out pathogens. Shallow wells under 50 feet should have UV because surface contamination can reach the casing after heavy rain. The only reliable answer is a coliform bacteria test from a state certified lab. If the test shows any coliform, install UV.
Yes, with the right stack. Rain becomes potable after a clean roof, a working first flush diverter, sealed and dark storage, and a four stage filter ladder ending in UV disinfection. Test the finished water at a state certified lab before you drink it, then test again every spring. If you are not willing to maintain the filters, use the rain for irrigation and laundry only.
A nominal rating means the filter catches most particles at that size but lets some through. An absolute rating means the filter catches 99.9 percent of particles at that size or larger. Always buy absolute rated cartridges when pathogens like giardia or cryptosporidium are on the line. The number on the label matters less than which rating system it follows.
Not usually. Reverse osmosis is the right answer when a lab test shows dissolved chemicals like arsenic, fluoride, nitrates, or heavy metals above safe limits. For general filtration, RO is overkill, wastes water, and strips beneficial minerals. Most homesteads run RO on a single under sink faucet for drinking water and skip it on the rest of the house.
Sediment cartridges last 3 to 6 months in average water and a few weeks in dirty water. Carbon block cartridges last 6 to 12 months depending on chlorine and organic load. One micron absolute cartridges last 6 to 12 months. UV lamps last 9,000 hours, which is roughly one year for a household running 24/7. Track pressure gauges on each stage to catch a plugged cartridge early.
A basic three stage cartridge stack costs 300 to 800 dollars in parts. A standard whole house system with sediment, carbon, one micron absolute, and UV runs 1,000 to 2,500 dollars installed. Premium systems with softeners, iron removal, or under sink RO push 3,500 to 7,500 dollars. Annual cartridge and UV lamp consumables run 200 to 400 dollars.
It can if it lives in an unheated space. Cartridge housings, UV chambers, and RO membranes all crack when frozen. Keep the stack indoors in a conditioned area, or build a small insulated enclosure with a thermostatically controlled heat lamp. Add drain valves at the lowest points so you can dump the system if the power fails. Ten minutes of prep beats a burst housing in February.

Cole
Founder & Lead Researcher
Cole is the founder of Plan Your Homestead. He works in clinical research and brings a research-first lens to every guide on the site, drawing on a long family line of farmers for grounded, practical perspective.
More in Off-Grid
More articles coming soon. Check back for new off-grid content.